Build date: 3-November-2010
Table of Contents
- 1. Introduction
- 2. The Text Editor
- 3. Interpreting a Kermeta code
- 4. Compiling a kermeta code into java
- 5. Debugging
- 6. Help
- 7. Transformations
- 8. Class diagram Kermeta Model editor
- 9. Kermeta Class TouchNavigator
- 10. Ecore Model Editor
- 11. Tip and tricks
Kermeta is distributed with a workbench that provides many features.
In the bundle version 1.3.0 you have:
Text editors for kermeta textual syntax and KET (kermeta template emitter)
an outline view
a problems view
an Ecore Model Editor (provided by Eclipse/EMF)
an interpreter
a debugger
a compiler (compiles your kermeta code into an eclipse java plugin)
Transformations to and from Kermeta. (especially to Ecore)
Other helper transformations like Ecore merge
Dedicated Graphic editor
Object TouchNavigator
KermetaDoc view (showing the documentation associated to your metamodel)
Help system
Useful features needing the installation of an external tool:
Class diagram Ecore Model editor. This feature is provided by EclipseUML (Omondo) (a community edition is available)
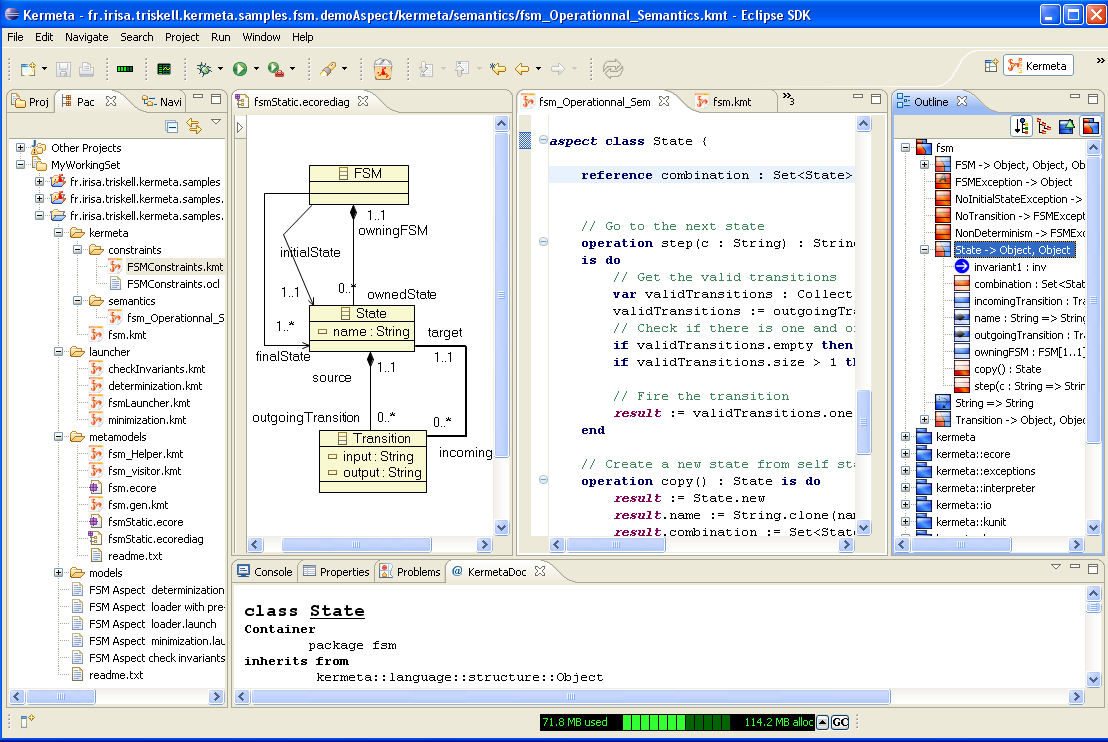
Here is a screenshot of a typical Kermeta workbench.
![[Warning]](gfx/admonitions/warning.gif) | Warning |
|---|---|
Kermeta is an evolving software and despite that we put a lot of attention to this document, it may contain errors or not conform to the latest version. If you find any error or have some information that improves this document, please send it to us using the bugtracker in the forge: http://gforge.inria.fr/tracker/?group_id=32 Last check: v1.2.2 |
Nowadays a textual editor is not just an editable document. Many informations have been provided to the user in order to get improved editing performances. It is quite common to find textual editor with coloring syntax, auto-completion and outline. These three items working together usually makes a good textual editor. That is the reason why the Kermeta platform provides such an editor. Below, you can find the global view of the Kermeta editor.

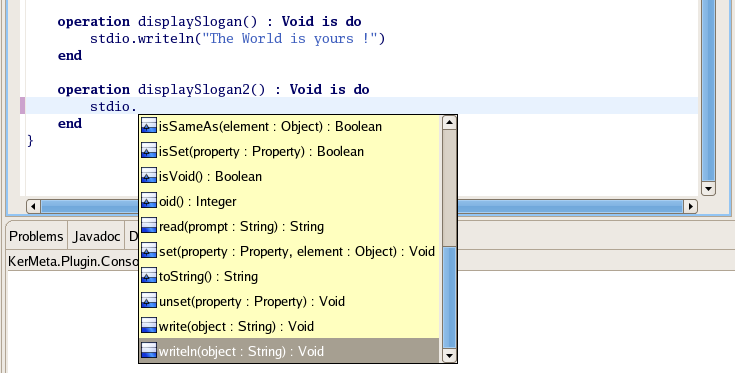
To develop faster and faster, some nice helpful tools now are usual. One of them is the auto-completion. According to a context, a list of item will be proposed. Using the arrows key and the carriage return key, you can select quickly and easily the item you want. The important thing is that, the list of item is calculated in order to only propose some relevant items. The figure below shows the auto-completion for "stdio" which is a special class in Kermeta (as System for Java). The typed point makes the system think that you want to call a method on "stdio". Then all the callable methods are proposed and you can choose one of them.
![[Note]](gfx/admonitions/note.gif) | Note |
|---|---|
The usual <ctrl>+<space> keyboard shortcut is used to access the code completion |
The outline is a structural view of your program. Code is not visible in this view, but the structure (packages, classes, attributes, methods and constraints) are visible in a tree hierarchy. Usually the outline position is on the top right side of the Eclipse's window. You can get advantages of the outline, when your program reaches a big size and when it is difficult to get a good visibility on the program's structure. Browsing the outline is much more faster than browsing the file. Moreover, clicking on an item (packages, classes, attributes or methods) brings you to that item in the file.
The following buttons are available on this view :
sort features : The content of the outline is sorted alphabetically.
Flatten inheritance : Show package hierarchy
Display all the features of your classes. The inherited features are displayed using a specific icon set.
Show imported types : Show all the classes that are declared using the require statement in this file.
| Note |
|---|---|
The Flatten inheritance also display the features of the Object class as all the Kermeta classes inherit from it. |
| Warning |
|---|---|
The "Show imported types" feature works on a per file basis and then it only shows the features declared using the require statement in this file and NOT all the files in your project. This option is really useful when you work with kermeta aspects since it display the elements in your faile and the elements imported by aspect. |
In addition, the elements are colored in order to help to identify where and how an element is defined.
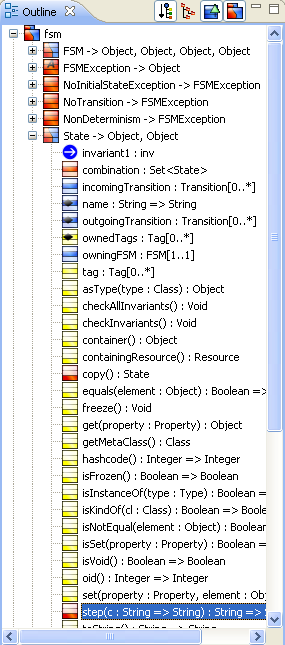
The following meaning are assigned to the colors in this view :
Red : The element is defined in the current file. It applies to : Packages, Classes, Attributes, References, Derived Properties and Operations.
Blue : The element is defined in an imported (required) file. It applies to : Packages, Classes, Attributes, References, Derived Properties and Operations. On classes features, this typically represent features imported via an aspect.
Yellow : The element is inherited from another class (regardless of the containment in the file). It applies to Attribute, Reference, Derived properties and Operations
Green : The operation is imported via an aspect and is still abstract.
Grey : The package doesn't define any class.
![[Tip]](gfx/admonitions/tip.gif) | Tip |
|---|---|
A double click will open the editor in order to show you the selected element. This feature works only if the element to display is in a kmt file. |
| Tip |
|---|---|
If you have activated the KermetaDoc view, it will show the documentation associated to the selected element. |
| Note |
|---|---|
In version 1.2.2, the constrains don't have a color differentiation. |
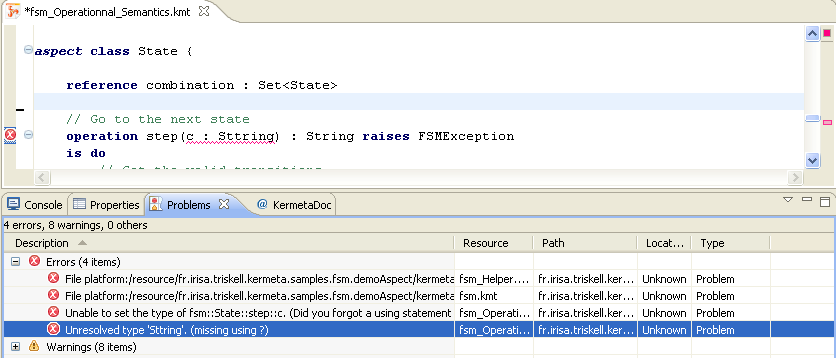
The textual editor is used to display extra pieces of information than simple text. In the figure below, a parsing error is reporting because of the semicolon which is not allowed in the language. The nice is thing is that in the Eclipse's problems view, just by double clicking on an error opens the erroneous file and make the cursor focusing on the correct line.
In addition, a list of all current errors is available in the general "Problems view".
Kermeta is meant an executable language and provides a debugger. So, the textual editor is used to interact with the debugger.
Like in a Java style, some breakpoints can be added to the program by right clicking on the grey line at the left of the editor (as in the figure below). The breakpoint will be added in front of the selected line. Afterwards, when running the debugger, the program will halt at every breakpoint it goes through. At this moment, you will be able to have a look at the variables' value and run step by step or step into some methods.
See Chapter 5, Debugging for more details on the debugger features.

Kermeta workbench allows to interpret and run your Kermeta code in several ways.
For those who already know how to run Java applications, this is a similar approach but for Kermeta files.
You'll need to create a new run configuration from the
"Run/Run..." menu.

![[Caution]](gfx/admonitions/caution.gif) | Caution |
|---|---|
The run menu is available only with some perspectives. If you don't see the run menu, switch to the Kermeta perspective. |
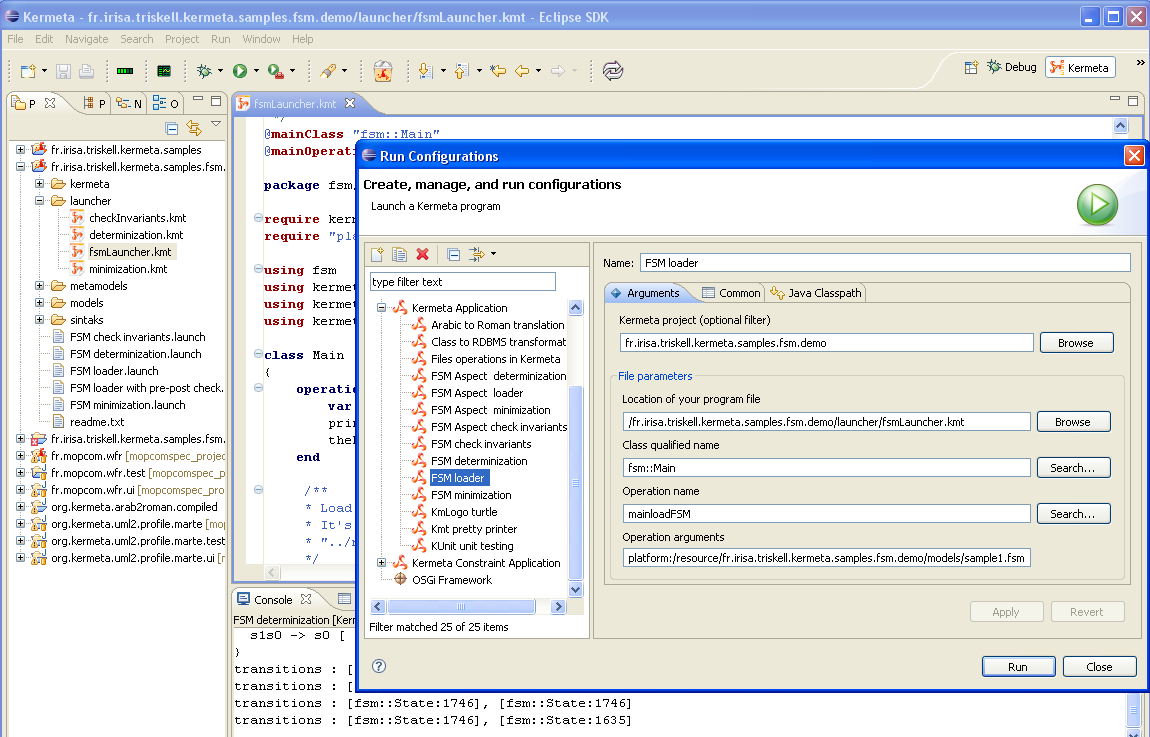
In the dialog, you selects the file, the main class and the main operation that must be run.
Search buttons will help you to find these elements in your files.
| Caution |
|---|---|
The search button may not work properly if your file contains errors. |
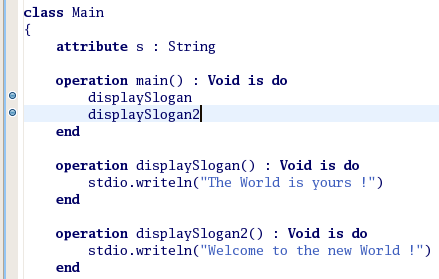
Two optional annotations in your Kermeta code allow you to save time while creating run configurations. The @mainClass and @mainOperation are used to fill field when creating a new configuration.
Ex:
@mainClass "fsm::Main"
@mainOperation "mainloadFSM"
Then, once you have your configuration, you can run it by all the
means provided by Eclipse. Ie. "Run Last Launched", "
Run History", ... available in the menus or in the
toolbars.
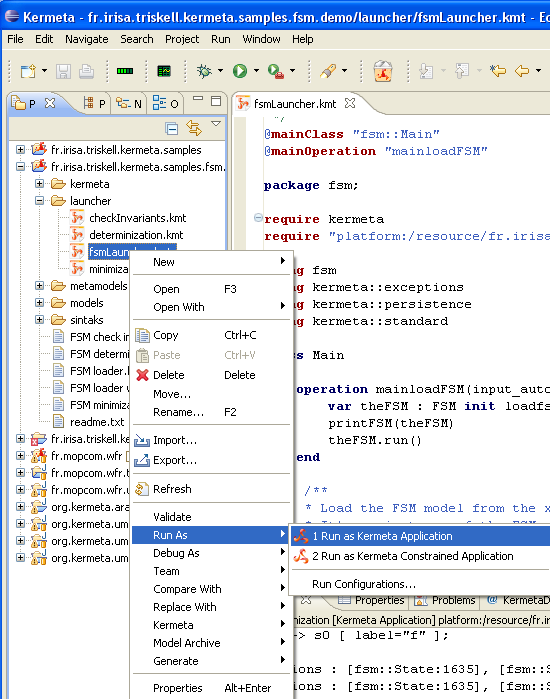
| Tip |
|---|---|
A shortcut allows you to quickly start a Kermeta run configuration. It is available in the popup menu of *.kmt files. The "
|
The operation arguments field allow you to pass some strings as parameters of the operation you are launching.
In this sample screenshot, the FSM take a string as teh path to the file that will be loaded and simulated.
In addtion to this simple scenario, in the common Tab of the Kermeta run configuration, you can:
save your configuration in a file, so you can share it with other users: in "Common" tab button "Shared file"
specify where the stdio outputs must be sent. Typically, this can be in the Eclipse console or in a file.
specify additional entries in the interpreter classpath that must be taken into while running this kermeta code. This is needed if you use "extern" call to your own jars.
| Tip |
|---|---|
If you specify the kermeta project u=in the run configuration and if this project is an eclipse plugin, then the interpreter will automatically take this plugin and all its dependencies into account in tha classpath. |
You can run Kermeta interpreter from the command line. For this you need to run the java class
org.kermeta.interpreter.api.RunCommandLine which is available in fr.irisa.triskell.kermeta.interpreter
plugin.
The RunCommandLine class allows to pass the name of:
the Kermeta source file, and optionally the name of the class and the
operation to run.
| Note |
|---|---|
The package org.kermeta.interpreter.api provides different facades in order to run a
Kermeta program with the interpreter from a java program. You can either have a look to the document
Deploying Kermeta code manual
or you may also have a look into class
|
The interpreter command line is available in two main forms : as a set of eclipse plugin (it is available with all kermeta version deployed in Eclipse, or as a standalone jar (see Kermeta download page for the various distributions).
The standalone bundle is available in two version : all in one jar (typically kermeta_standalone_full_1.3.0.jar),
or only kermeta in the main jar (typically kermeta_standalone_no_thirdparty_in_main_jar.1.3.0.zip. In this second version, the thirdparty jar aren't included.
Depending wether you use the standalone jars or the jar embedded in eclipse, the process will be more or less simple. The simpliest is to use the standalone version because you don't need to deal with the classpath.
java -jar kermeta_standalone.jar -U ecore_mdk/add_observer.kmt -C pattern::AddObserver -O maininput_models/needs_observer.ecore output_models/ Compteur Afficheur

Example 3.1. Simpliest use of the standalone version on the command line
The command line needs several options to run properly a kermeta program.
.
-C : (takes 1 argument) Qualified name of the class to run
ex: myPackage::MyClass
Note that it will not instanciate the class (ie. self will return void)
-H : (takes 0 argument) Display the help
-T : (takes 0 argument) Run as a test suite
-P : (takes 0 argument) Display Profiling info
-K : (takes 1 argument) Location for kermeta standard unit(framerwork.km) (KermetaUnit.STD_LIB_URI variable)
-O : (takes 1 argument) Name of the operation to run
-U : (takes 1 argument) URI of the unit file that must be loaded
-M : (takes 1 argument) Indicate a file containing URI_MAP (This is useful to solve some model loading troubles)
Other values on the command line will be passed as string to the operation
java -jar kermeta_standalone.jar -P -U ../ModelEngineeringCourse/transfo/add_observer.kmt -C pattern_macros::Main -O main
Example 3.2. Example of a kermeta program called with the standalone version on the command line
When you run a kermeta program outside of Eclipse, the uri of type platform:// are not resolved since this is the role of Eclipse to resolve them. So, when running outiside of Eclipse, you need to help this resolution.
The resolution can be done using a map, whenever it find the key, it will replace it with the associated value. Like that you can transform platform:/plugin/ into a physical location in your disk.
With RunCommandLine.java, this is the option -U which allow to specify a file that contains the mapping.
This uri map file uses the syntax of java properties files.
Example of uri.map file which maps some platform:// urls into file:// urls
#Typical uri.map file
"platform:/plugin/"   "file:/C:/eclipse3.4/eclipse/workspace_head/"
"platform:/resource/" "file:/C:/eclipse3.4/eclipse/workspace_head/"
"kconf:/loader/"      "file:/C:/eclipse3.4/eclipse/workspace_head/org.kermeta.io.loader/instances/"
This special uri is used by kermeta to retrieve the folder Another easy way (not detailed here) would be to retrieve one of the standalone versions and run it from eclipse. |
| Tip |
|---|---|
With this map mechanism, you can also translate the platform uris into jar protocol. This protocol allows to search
within a jar. for example, |
In this section we focus on calling the interpreter embedded in an eclipse installation.
| Note |
|---|---|
This is quite an advanced use case recommanded only for people who understand how eclipse files are organized and can manually create a classpath to retreive the various jar in eclipse installation. |
From eclipse, you create a Java application LaunchConfiguration that will run the interpreter with your Kermeta file.
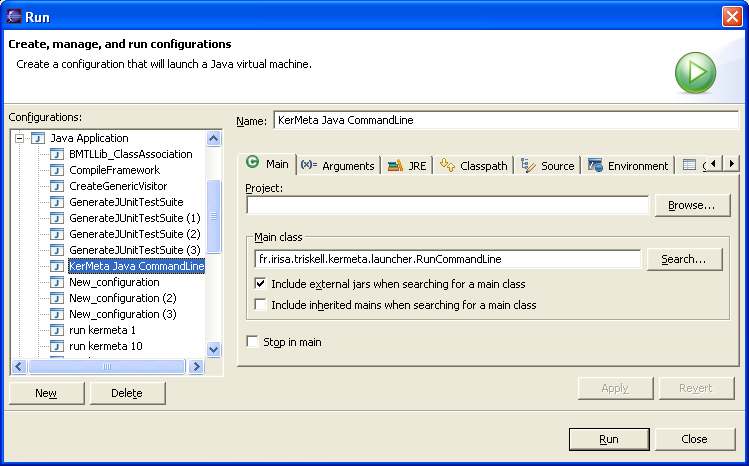
Be careful, you must select "Include external jars when searching for a main class".

The output level of interpreter traces can be set using a log4j
configuration file. The concrete file to use is set by the java property
"kermeta.log4j.configurationfile.name". A sample of log4j configuration
file is located in the fr.irisa.triskell.kermeta.model plugin.
Exemple add the following in the VM arguments box: -Dkermeta.log4j.configurationfile.name= "../../plugins/fr.irisa.triskell.kermeta.model_1.3.0/kermeta_log4j_configuration.xml"
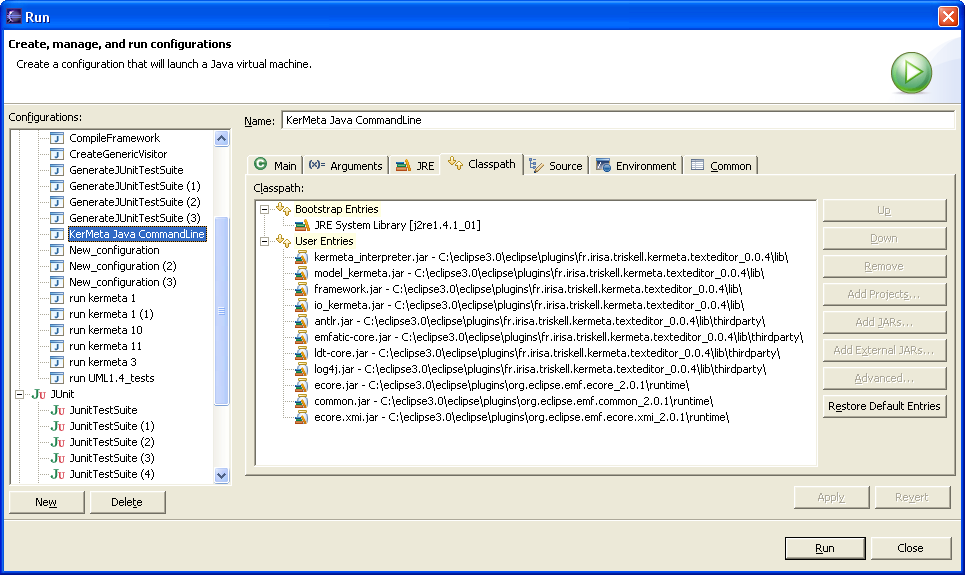
The classpath must be carefully set using the jar of Kermeta, the jar of Ecore and of emf.
| Tip |
|---|---|
This RunCommandLine class or one of its sibling can also be used by any of your java programs.For more information please see the Javadoc reference of RunCommandLine. |
| Warning |
|---|---|
This method need to know precisely which jar you use. If you update any of the required plugins (kermeta, emf, ecore , ...) the directory containing the jar will change because eclipse use the version number as part of the directory name. You'll have to manually change to ant file in order to reflect the update. |
The workbench allows you to transform you kermeta code into Java-EMF code.
The Kermeta compiler consists on a transformation from a kmt file to an Ecore file (step 1), finally the generation a plugin with the Java by using the EMF facilities (step 2). The resulting Java may be used both in Eclipse Application or in Java Application (standalone) and is fully compatible with EMF. A listing of dependencies is available below. The compiling process generates a set of files: *.km, *.traceability, *.ecore, *.simk, *.genmodel. A configuration file may be added: *.compiler.properties (more info. below). The 2nd step may be replayed by a right-click on the generated Ecore file.
Right click on a kmt file: "Compile Kmt to EMF plugin (Experimental)", then an Eclipse plugin will be generated, after that you can try to run one generated main contained in runner Java package.
You are able to add a "properties file" for customizing the plugin generation. This file must be in the same folder than the main kmt file and respect the naming rule: {kmt_file_name_without_the_kmt_extension}.compiler.properties This configuration file will be taking into account, when you are compiling from a kmt file or the generated ecore file, for this last case you are able to re-generate the plugin without redo kmt2{ecore, simk} The available properties are listed below, every property is optional (the values are String without quote):
plugin_id = {name and id of the generated plugin}
copyright_header = {header include in each file}
require_bundles = {plugin dependencies if your program depends on external plugins} | String separated by comma
bundle_version = {version number of your plugin like 0.1.0 instead of the default 1.0.0}
main_operations = {operation qualifiedNames} | String separated by comma, e.g.: mypackage::MyClass::myMainOperation, mypackage::MyClass::myMainOperation2
unzip_externs = {zip file containing the externs required to the compiled source code} | String separated by comma, the String is composed of 2 parts separated by a ";", the first part is the location of the zip file, the second one is the folder in the generated plugin, ex.: platform:/resource/MyProject/util/externs.zip;src/java
enable_emf_load_initialization = {enable EMF-reflection load initialization for large model} | String equals to true or false
Right-click on the generated class containing the Java Main method or you are able to create a "Java Run Configuration" pointing the Java Main method
Creating a standalone version of your compiled code, required libs:
classpathentry kind="lib" path="C:/eclipse-ganymede/eclipse/plugins/org.eclipse.emf.common_2.4.0.v200808251517.jar"
classpathentry kind="lib" path="C:/eclipse-ganymede/eclipse/plugins/org.eclipse.emf.ecore.xmi_2.4.1.v200808251517.jar"
classpathentry kind="lib" path="C:/eclipse-ganymede/eclipse/plugins/org.eclipse.emf.ecore_2.4.1.v200808251517.jar"
classpathentry kind="lib" path="C:/eclipse-ganymede/eclipse/plugins/org.eclipse.core.resources_3.4.0.v20080604-1400.jar"
classpathentry kind="lib" path="C:/eclipse-ganymede/eclipse/plugins/org.eclipse.core.runtime_3.4.0.v20080512.jar"
classpathentry kind="lib" path="C:/eclipse-ganymede/eclipse/plugins/org.eclipse.emf.codegen_2.4.0.v200808251517.jar"
classpathentry kind="lib" path="C:/eclipse-ganymede/eclipse/plugins/org.eclipse.emf.ecoretools.registration_1.0.0.jar"
classpathentry kind="lib" path="C:/eclipse-ganymede/eclipse/plugins/org.eclipse.equinox.registry_3.4.0.v20080516-0950.jar"
classpathentry kind="lib" path="C:/eclipse-ganymede/eclipse/plugins/fr.irisa.triskell.eclipse.util_1.2.0.jar"
classpathentry kind="lib" path="C:/eclipse-ganymede/eclipse/plugins/org.eclipse.equinox.common_3.4.0.v20080421-2006.jar"
classpathentry kind="lib" path="C:/eclipse-ganymede/eclipse/plugins/org.eclipse.core.jobs_3.4.0.v20080512.jar"
classpathentry kind="lib" path="C:/eclipse-ganymede/eclipse/plugins/fr.irisa.triskell.kermeta.model_1.2.0.jar"
classpathentry kind="lib" path="C:/eclipse-ganymede/eclipse/plugins/org.eclipse.osgi_3.4.0.v20080605-1900.jar"
| Note |
|---|---|
This listing is in progress. Also the exact version of the plugins used may vary depending of your version of Keremta and Eclipse. |
Since v0.1.0 Kermeta has a debugger. As any debugger, it proposes breakpoints step over, step into, run, resume, visualization of variables, etc
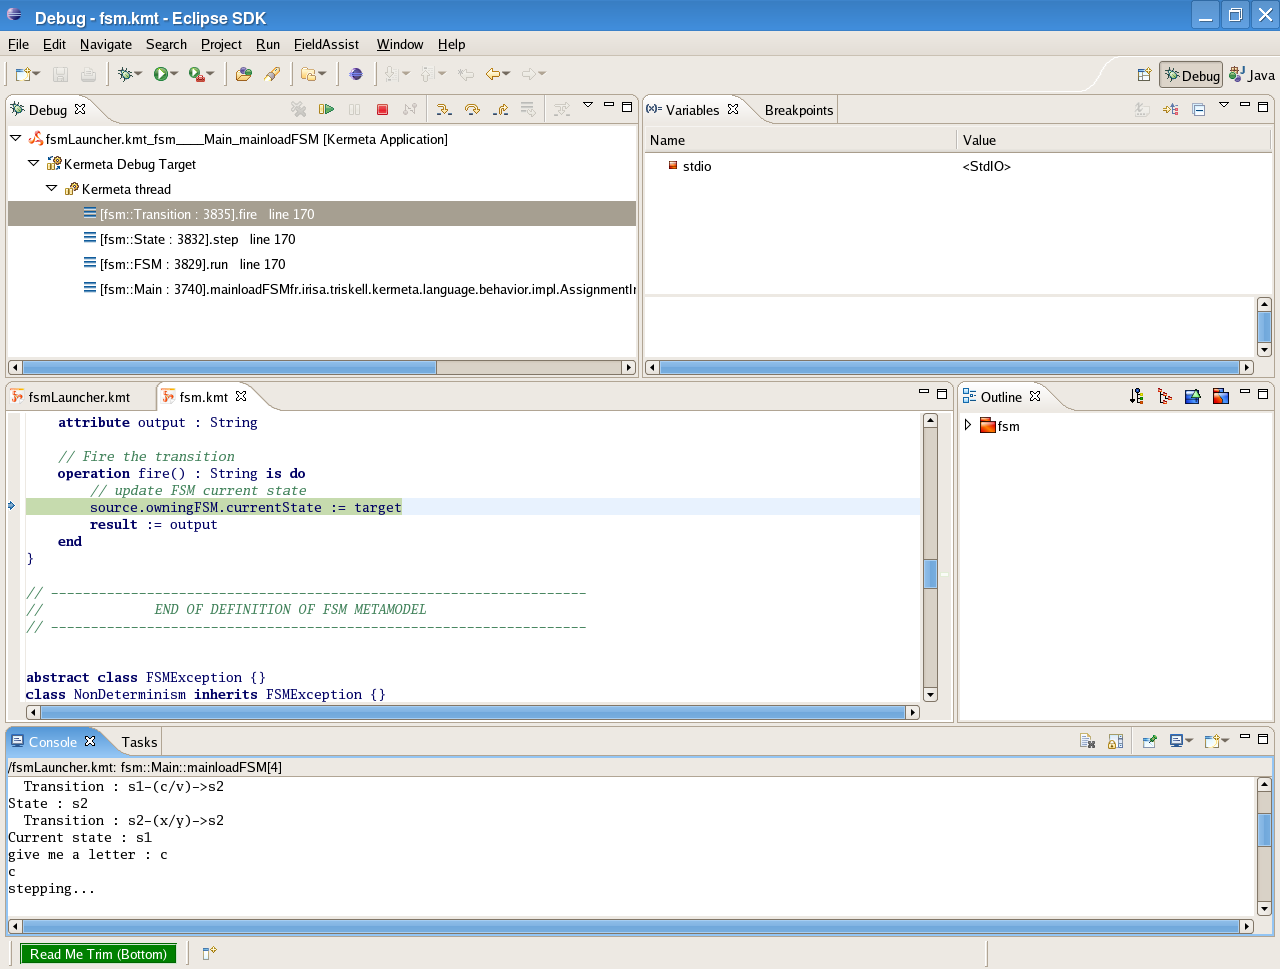
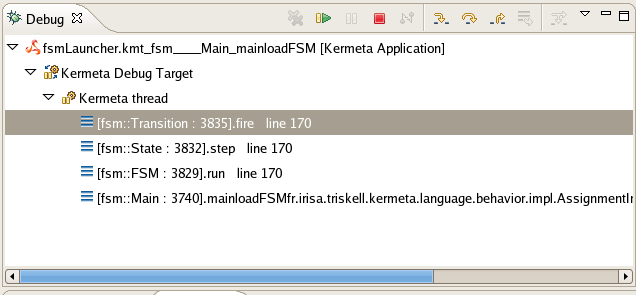
A debugger offers users the possibility to interpret Kermeta's programs step by step, or stopping programs at one moment to check the the programs' state. Above you can see the global view of the editor.
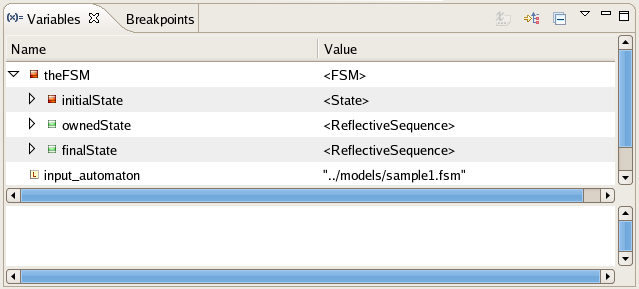
During programs execution, you may want to know variables' values. For that purpose, you can use the watch view which displays all the variables accessible in the current context and their values. Moreover you can browse those variables to have a deeper look inside variables.
A frame is a context environment for a call method. That means that for each method call, you have access to its context that is to say the variables values. Obviously, it is strongly related to the watch view. Clicking on one frame modifies the watch view. The frame view is also nice to follow the execution. For instance, in the figure above, we know that the run method has called the step method which has called the fire method.
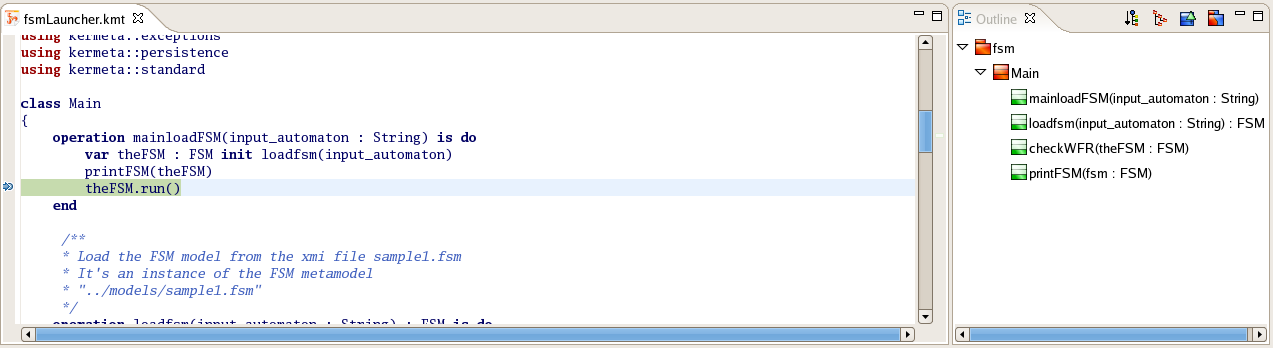
When debugging, you surely want to know which line of code is executed. That is the reason why the Kermeta text editor is displayed with the outline. The current line of code is colored in green as in the following figure. This green line is moving to the next instruction depending your action.
There are three kind of actions you can execute:
F5 : pressing the F5 key makes the debugger entering in the current operation.
F6 : pressing the F6 key makes the debugger stepping to the next operation.
F8 : pressing the F8 key makes the debugger executing all the operations to the next breakpoint, if there is some one.
| Note |
|---|---|
A nice feature is that you can add or remove breakpoints to your Kermeta file during debugging. |
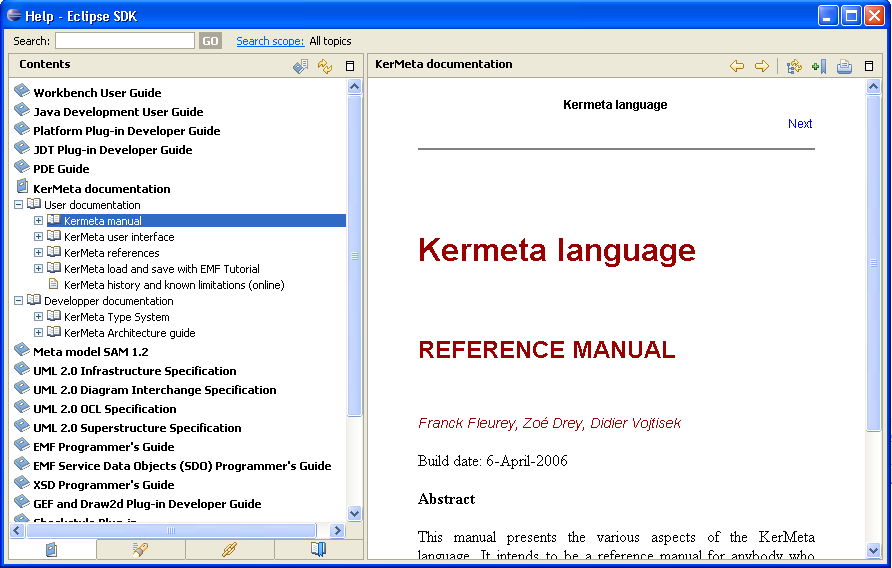
The current help and many other documentation are available in the Eclipse Help system of your Eclipse installation: open Help -> Help Contents
| Tip |
|---|---|
Alternatively, an online version of all those documents is available at http://www.kermeta.org/documents |
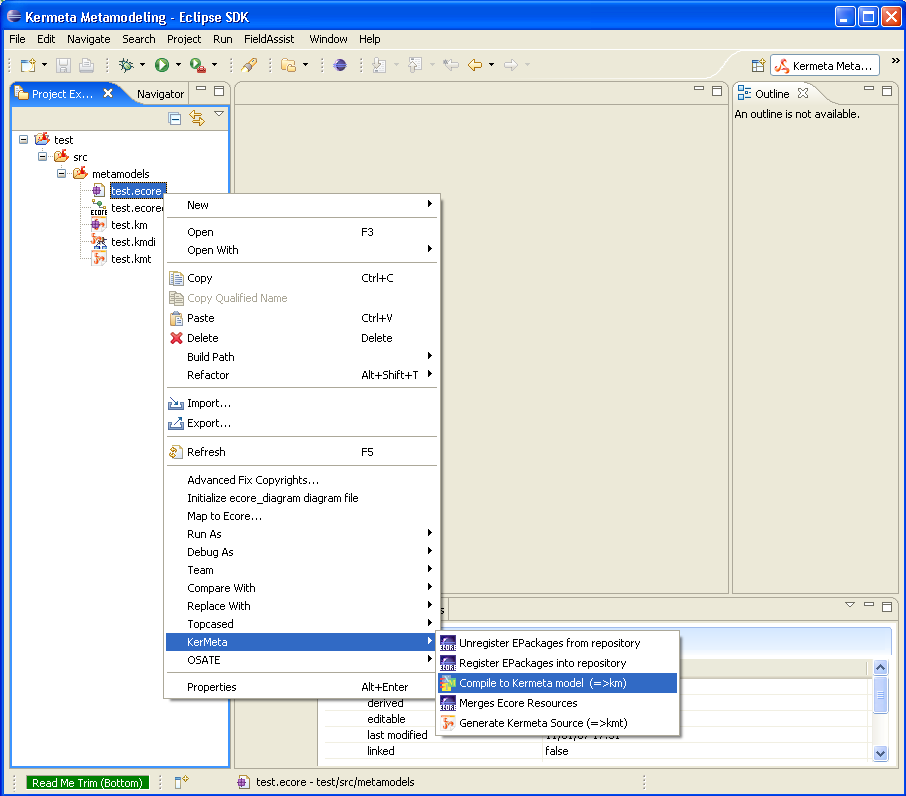
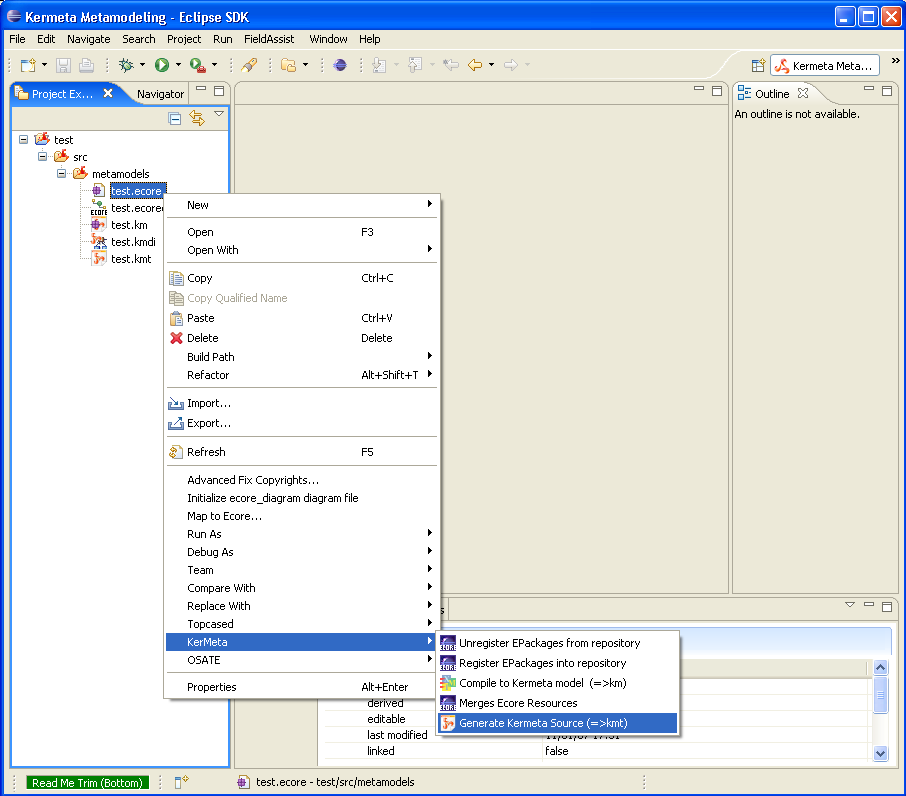
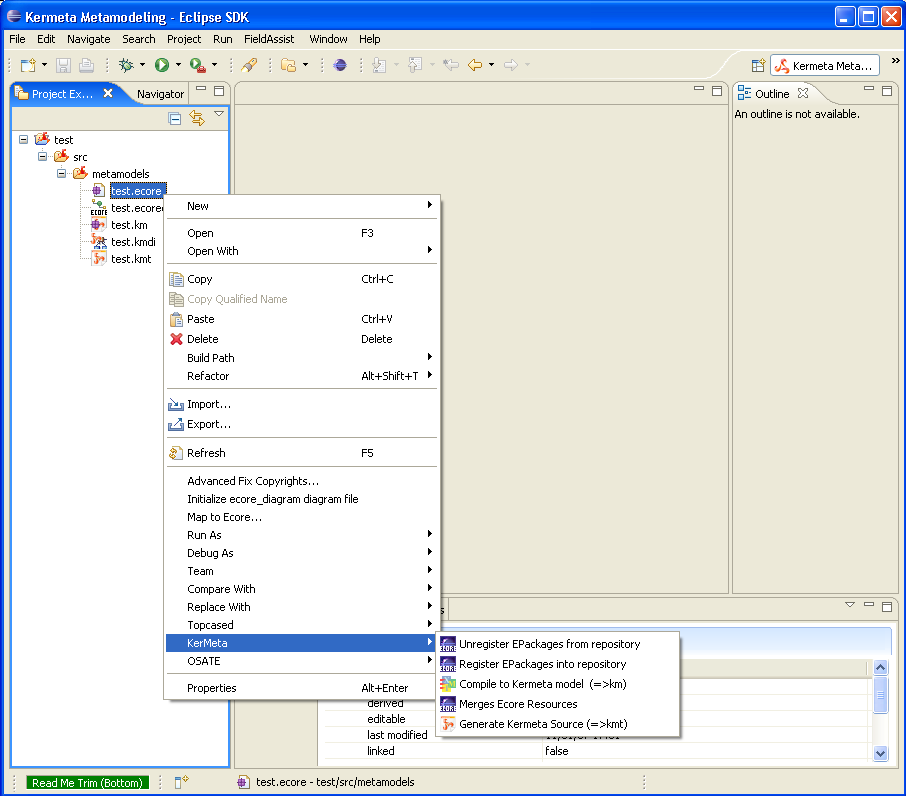
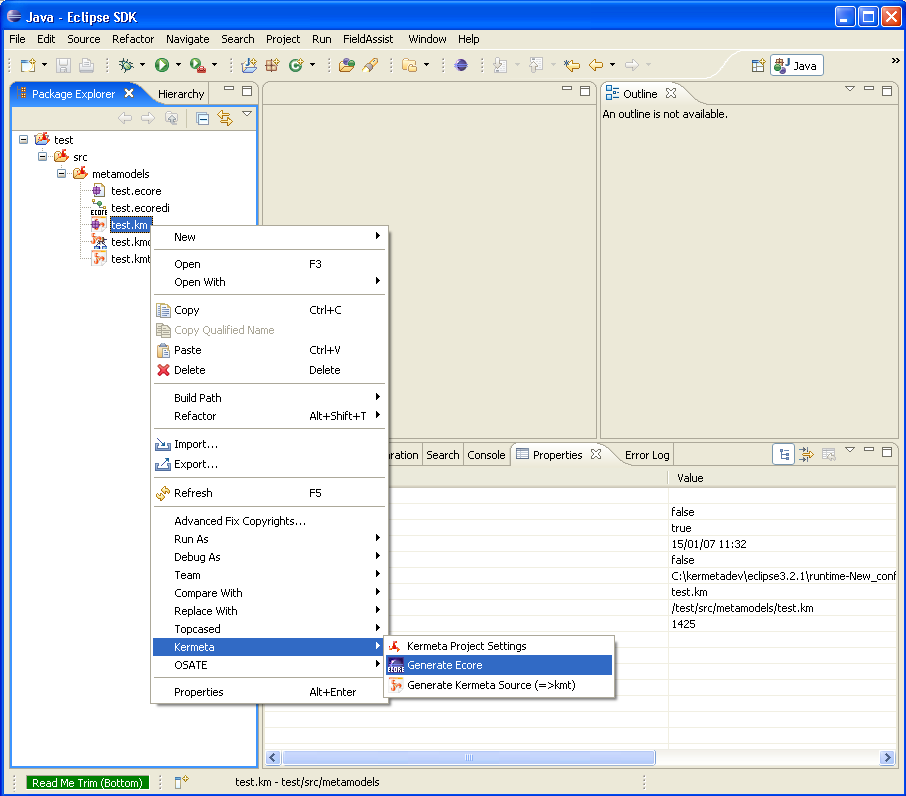
The workbench provides several additional tools available directly on the files using the popup menu.
![[Important]](gfx/admonitions/important.gif) | Important |
|---|---|
Several of the wizards provided are multipages wizards. This means that several advanced options are available only after clicking on "Next" instead of clicking on "Finish". So if you get an error while transforming a file, make sure that none of the options (on the main page or on the "Next" pages) fix the default behavior for your special need. |
Export functions: On ecore file you can export it into a KM (kermeta program in xmi format) or in kmt (Kermeta program using its textual syntax). As the ecore model may not be valid, the wizard provides some quick fixes. Those quick fixes will for example detect and propose a default solution for multiple operations with the same name.
Merge function: You can merge several ecore files, simply select them and click "merge". Its algorithm is base on the names of the packages and classes.
Register/Unregister EPackages function: You can register or unregister in the EMF registry the EPackages defined in an Ecore model, simply select them and right-click "Register" or "Unregister".
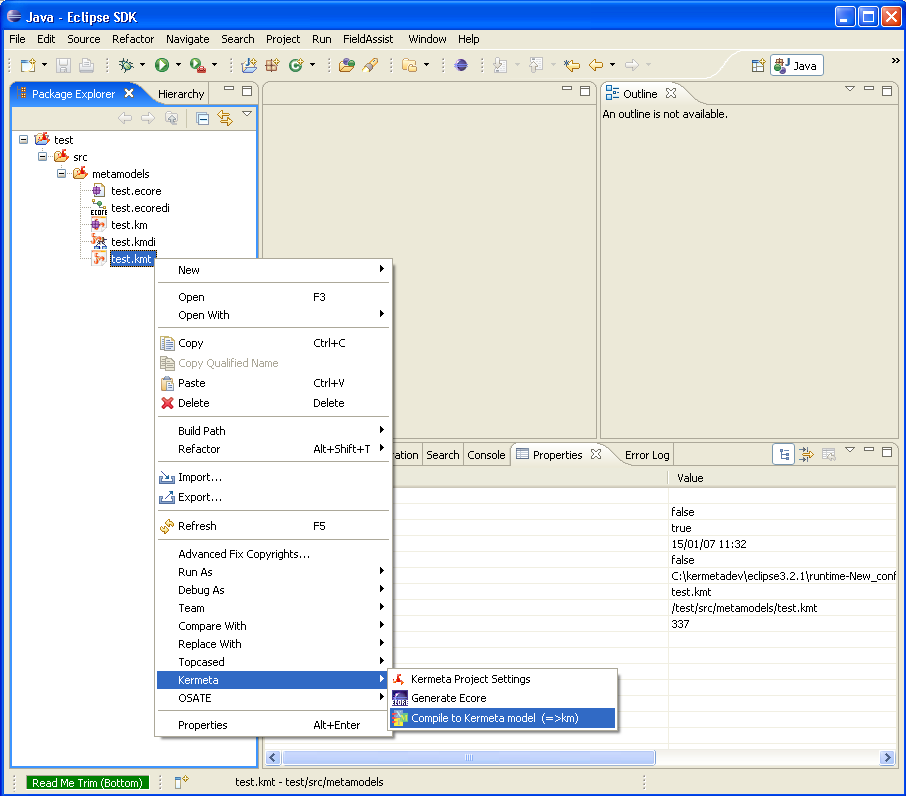
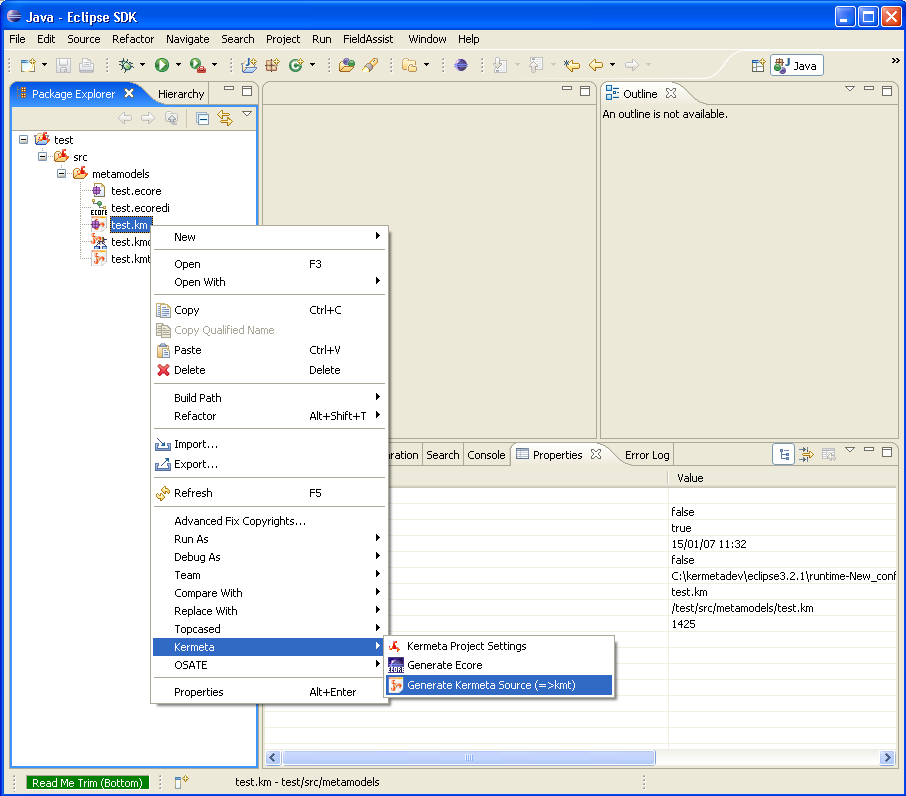
From a kmt files you can export it to an ecore file. Each of the kermeta notion that don't have a specific representation in ecore are stored into ecore annotations that will allow to roundtrip back to kermeta.
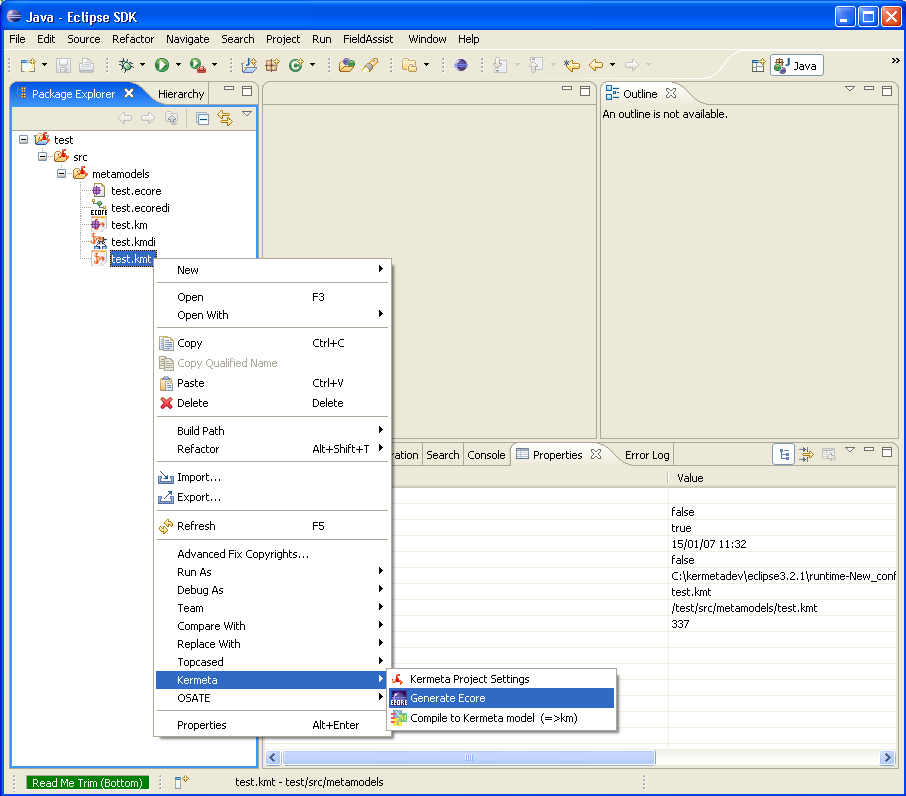
The kmt file can also be exported into its model version (ie. Into a XMI file conformant to kermeta metamodel). This is useful as this process also typecheck the model and thus allow to save some time when loading other file which rely on the km version rather than the kmt version.
From a km files you can export it to an ecore file. Each of the kermeta notion that don't have a specific representation in ecore are stored into ecore annotations that will allow to roundtrip back to kermeta.
You can also prettyprint this model representation of a kermeta program into the textual representation of this program.
For many of those transformations, the wizard will propose you to store the traceability informations.
This is a special metamodel that stores a link between the sources elements and the target element so you can reuse it later. For example, it will help the debugger to retrieve the correct line in the text version of the source file even if you are running the km version.
This metamodel is very generic and can be used for any model.
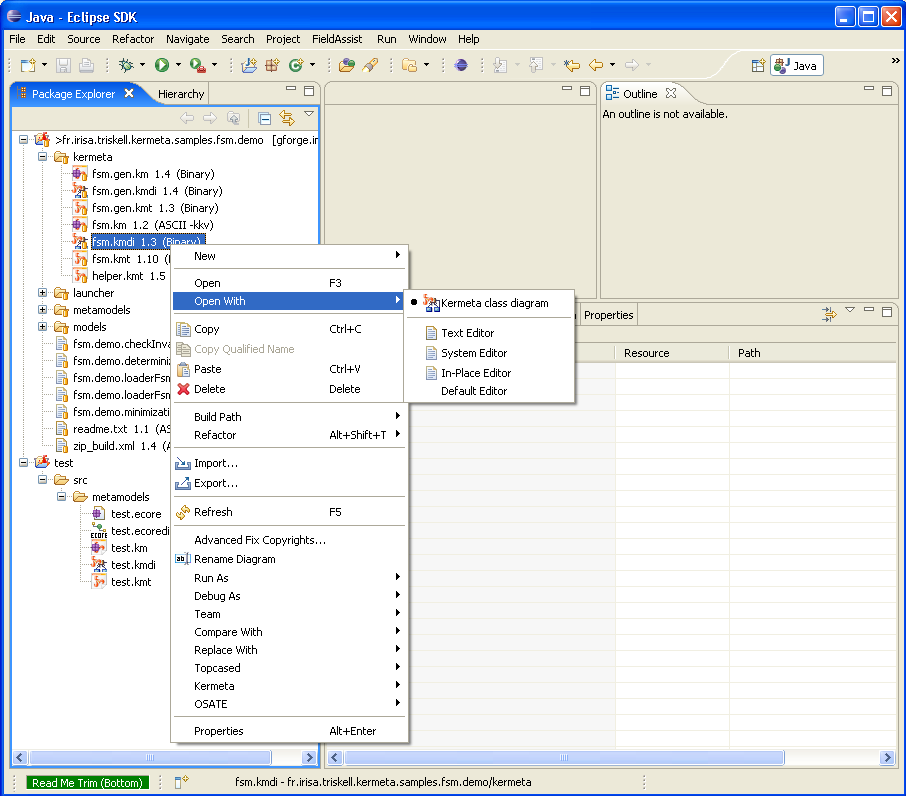
The Kermeta Graphical Editor is a view of the Kermeta model as a class diagram. It is generated with the tool "Topcased". The file containing the presentation informations is a *.kmdi. The *.kmdi is associated with a *.km file. The *.kmdi and *.km files must be in the same folder.
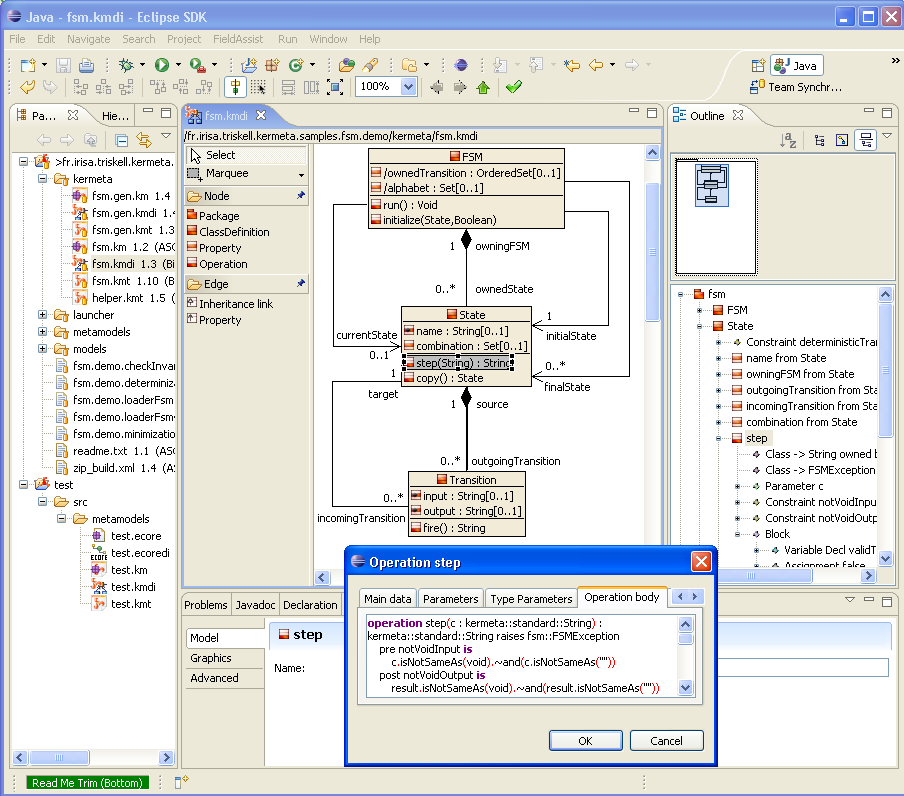
We can open it, simply select and right-click "Open with / Kermeta class diagram"
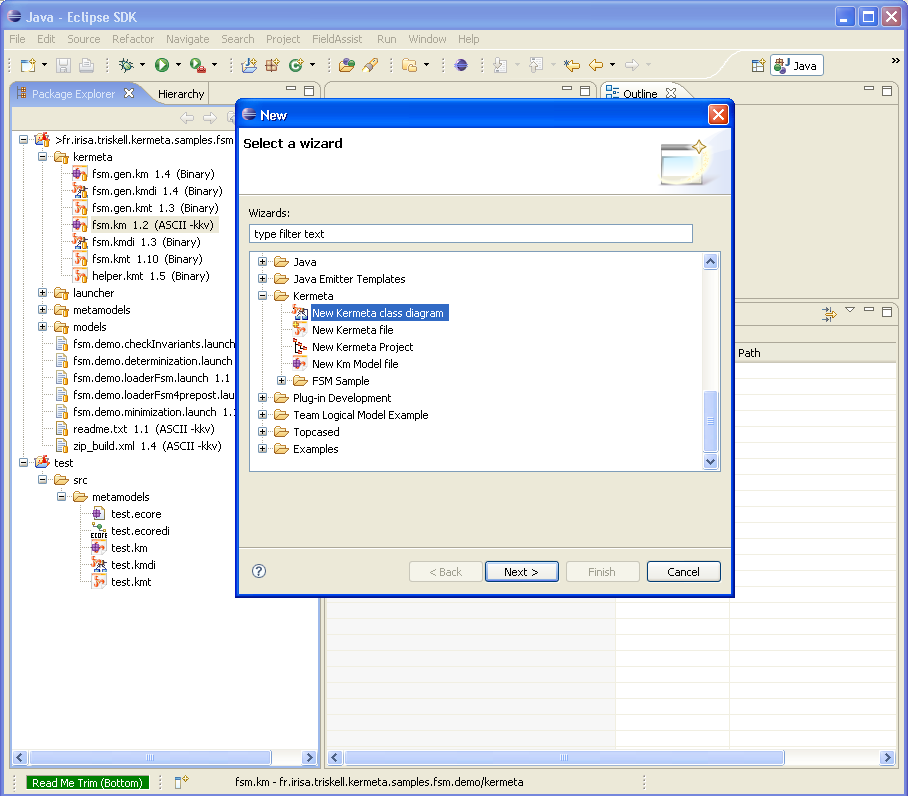
In order to create a Kermeta class diagram you have 2 ways.
Create a class diagram and the Kermeta model from scratch. Select the project or the folder where you want create the class diagram and right-click "New / Other / Kermeta / New Kermeta class diagram". Change the model name if you want.
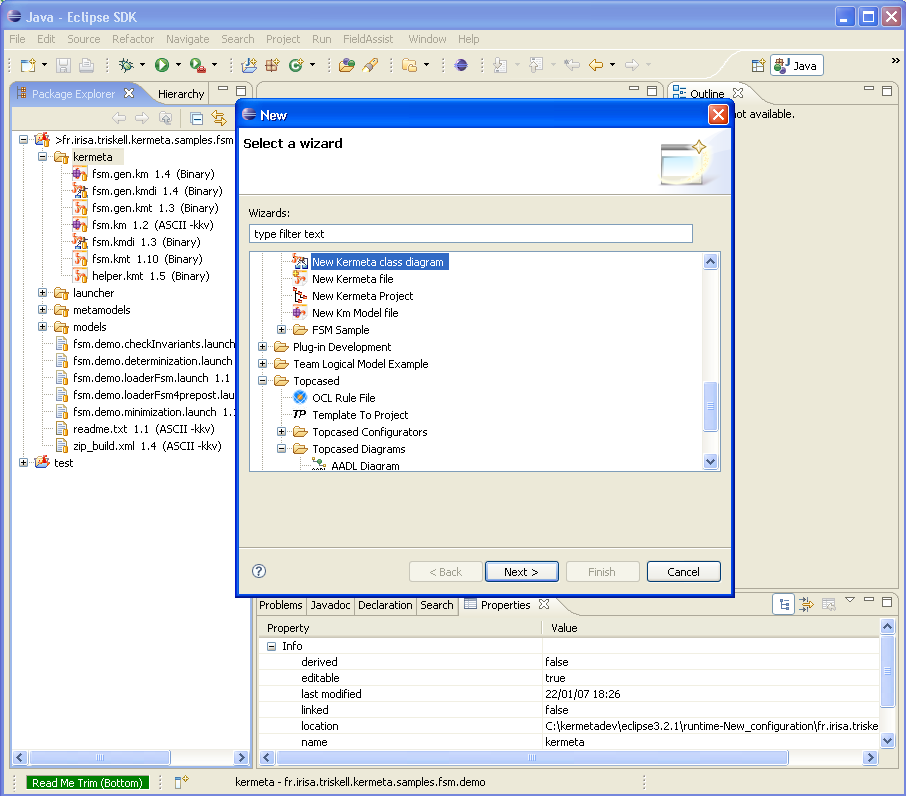
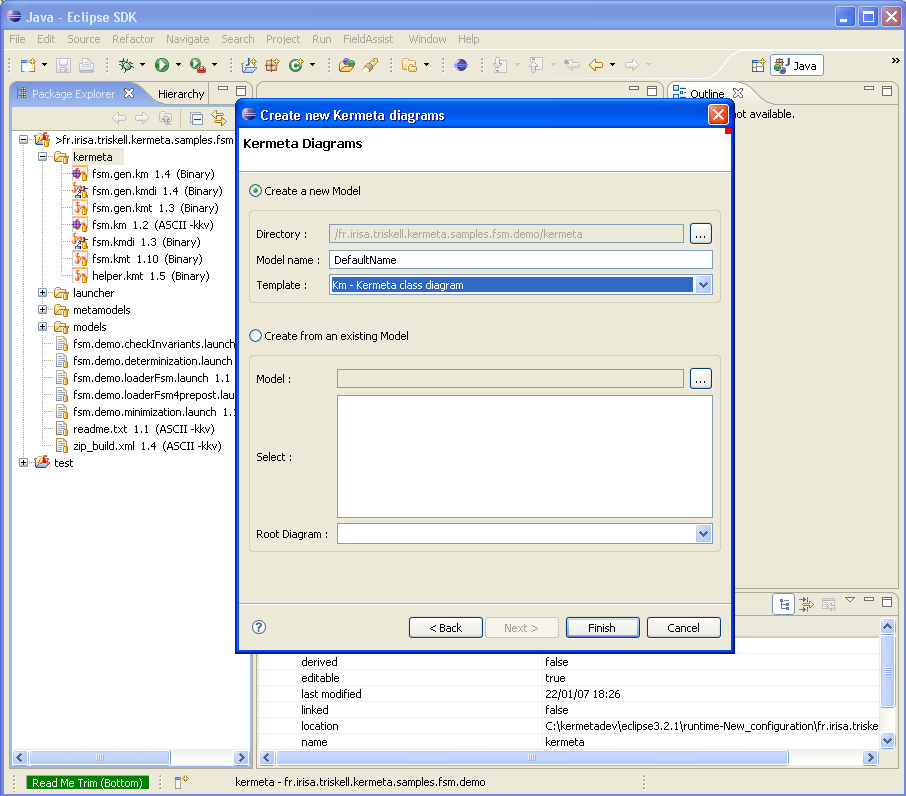
Create a class diagram from an existing Kermeta model. Select the existing km file and right-click "New / Other / Kermeta / New Kermeta class diagram".

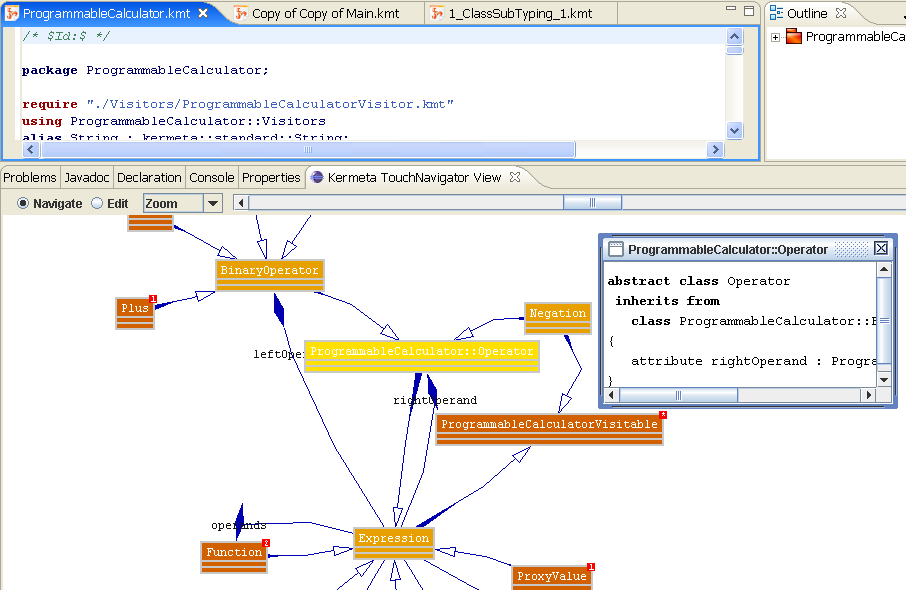
The Kermeta Class TouchNavigator is a view that dynamically focuses on the element you are viewing in the editor or the outline.
With its damping animation, it proposes an original way to navigate and analyze your metamodel classes.
>The color depends on the distance to the selected node.
Back and Forward button allow to navigate the history of selected nodes.
It provides several lens for smarter visualization. For example you can zoom, rotate, set the locality (ie. How much nodes you display at once depending on the distance to the selection) or use the hyperbolic lens (Ie. Change the edge length depending on the distance).
If you leave your mouse over a class, it shows its documentation.
| Tip |
|---|---|
It is in alpha stage, feel free to notify us what you found interesting or not in this view. |
This Editor is provided by Eclipse in EMF.
Since Kermeta metamodel is an extension of EMOF, it is possible to use this editor to edit Kermeta programs.
This based on the Ecore2Kermeta and Kermeta2Ecore transformations.
With the Ecore representation of your program, you can use the Ecore Model editor (from Eclipse\EMF) or any other Ecore tool (for example Omondo.graphic editor)
This is described with more details in the EMF tutorial: http://www.kermeta.org/docs/html.single/KermetaEMFTutorial/
| Tip |
|---|---|
This section contains many useful information about how to use the Kermeta workbench. |
Keyboard shortcut | Action |
|---|---|
<CTRL>+<SPACE> | Pertinent code completion. This work in several places in the code. |
[TODO check with the platform tip and tricks page which eclipse shortcut correctly work with Kermeta editor]