
Reference manual
Build date: 3-November-2010
Abstract
This tutorial is a step-by-step user-guide to the process of building a DSL using the Kermeta language.
Table of Contents
Kermeta is a Domain Specific Language dedicated to metamodel engineering. It fills the gap let by MOF which defines only the structure of meta-models, by adding a way to specify static semantic (similar to OCL) and dynamic semantic (using operational semantic in the operation of the metamodel). Kermeta uses the object-oriented paradigm like Java or Eiffel.
This document is an user-guide to create a DSL using the Kermeta language. This main document explain the different processes to rapidly achieve this goal. For a direct acces to the how-to and the examples, please refer to those presented in the FSM Tutorial and the Logo Tutorial. For the explanation of the concepts mentioned here, please refer to the Kermeta manual.
![[Important]](gfx/admonitions/important.gif) | Important |
|---|---|
Kermeta is an evolving software and despite that we put a lot of attention to this document, it may contain errors (more likely in the code samples). If you find any error or have some information that improves this document, please send it to us using the bug tracker in the forge: http://gforge.inria.fr/tracker/?group_id=32 or using the developer mailing list (kermeta-developers@lists.gforge.inria.fr) Last check: v1.4.1 |
![[Tip]](gfx/admonitions/tip.gif) | Tip |
|---|---|
The most update version of this document is available on line from http://www.kermeta.org . |
This document is an user-guide to create a Domain Specific Language (DSL) using the Kermeta language. This main document is a 10 minute-reading document and explains the different processes to rapidly achieve this goal. Thanks to the implemented functionalities inside Kermeta language, we can easily manipulate models, weave an compose elements without altering the core of our model.
| Important |
|---|---|
We recommend to the beginner to read this document till the end first. Advanced user might directly jump to the concrete examples : the FSM tutorial or the Logo Tutorial. |
For the explanation of the concepts mentioned here, please refer to the Kermeta manual.
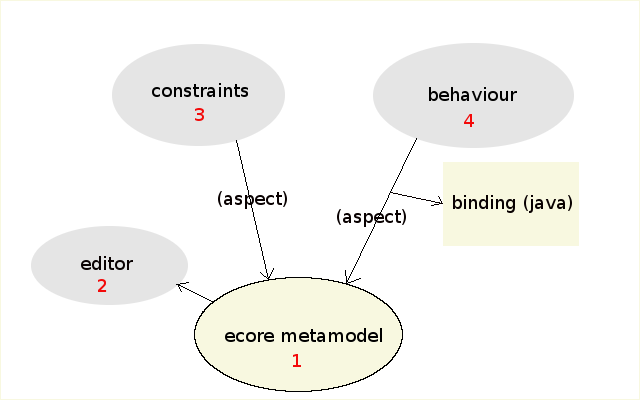
The main goal of this tutorial is to describe the main processes to provide Model Development Kit (MDK) to your DSL.
The big picture of this tutorial is illustrated in the figure below:
starting from an ecore metamodel;
we will provide editor to create its instance-model;
we will add contracts (through aspect weaving with Kermeta) to manage constraints specified inside the metamodel;
we will add some behavior (through aspect weaving with Kermeta) where you can bind with another framework (provide GUI defined with another language - Java for example).
meta-model / Ecore model: both terms are used to point to the meta-model level. “Ecore model” corresponds to the Eclipse terminology for a meta-model specified in Ecore.
instance: in the context of this tutorial, the term “instance” is used to refer to an instance of a meta-model i.e. of an Ecore model. Sometimes we will talk about instance-model (an Ecore model which is an instance of the meta-model) so don't get confused.
model object / root class: in the scope of the EMF dynamic editor, these terms designate the model root class that contains all other ones. This is usually a good practice to define a class which is the only one in a model to have no container (i.e. which has no “black-diamonded” relation pointing to it).[1]
containment: this term designates an important property of classes associations. This property has to be appropriately set[2], in such a way that all the elements of an instance-model should be accessed from the root class of the model, which is aimed at being the highest-level container.
The fisrt step is to focus on the concept of the language that you want to implement. These concepts define the abstract syntax of the language. Usually, it is represented by an ecore metamodel which is the starting point of this tutorial.
So first things first! Let's create the ecore file which is a class-diagram where a class represents a main concept of the language. We won't forget to set up its nsURI. As a standard ecore file, any ecore aware tools can be used to visualize it. To that extent, you can choose to generate/initialize its ecorediag file which contains the graphical informations of the metamodel elements. Then, you can generate the model code provided by EMF genmodel.
With Kermeta, you can also "program" your metamodel. Instead of designing it with its representation, you'll textually define the concepts of your metamodel. By calling the generate ecore metamodel on your Kermeta program source (.kmt), you obtain the ecore file.
| Tip |
|---|---|
If you want to learn more about how to create an ecore metamodel with eclipse, please refer to the "How to create metamodel tutorial". |
![[Note]](gfx/admonitions/note.gif) | Note |
|---|---|
An overview of an ecore diagram is available inside the examples below :
|
In this task, you will learn how to provide editors to manipulate instance-model which conforms to your metamodel. There are many ways to do so. As these techniques are independant from each other, you can experiment each of them according to your needs.
Before editing, you should create an instance-model with the dynamic instance. This is the most simple and fastest way for creating an instance of a meta-model. Creation is accessible by right-clicking onto the root meta-class. Because of the containment property, classes are only available for creation through this root class.
| Note |
|---|---|
Illustrations of this technique can be seen in the dedicated part of the tutorials :
|
Then, the simplest tree view is a way to manipulate instance-model. Generally you can find it in the Outline view. You can populate your model by right-clicking on an element, this triggers a popup menu where you can choose to create child or sibling element.
| Note |
|---|---|
An illustration of create metamodel using tree view is available in :
|
Textual editor allows you to "program" your instance-model. Instead of designing it with its representation, you 'll textually define the concrete syntax of each concept of your metamodel. As a result, you'll get an instance-model conforms to your metamodel. Many tools allow us to achieve this goal such as : Xtext, EMFText, Sintax. Basically, these tools connect with the metamodel to define its concrete syntax and generate the according code.
| Note |
|---|---|
If you want to have an example on this technique, please refer to the example in :
|
The last manipulation technique of a metamodel is to do so in a graphical way.
| Note |
|---|---|
A dedicated tutorial covers the process to define such kind of editor in :
|
This section illustrates some importants steps in order to succesfully manipulate the metamodel in Kermeta. This is about why to register your metamodel and how to load/save it.
Thanks to the persistence library, you can serialize (save and load) models. The persistence library is inspired from the resource manager of EMF models. There is a repository (called EMFRepository) containing a set of resources (the EMFResources). Each resource contains a reference called instance which contains all the root classes of the loaded model (there is usually one root class). So, the procedure of creation of a resource that will handle EMF models is the following :
Instanciate an EMFRepository;
Create a new EMF resource in this repository;
Load this resource;
Get the instances, i.e. the root class(es). All other instances can then be accessed by navigating the root class(es) properties.
| Note |
|---|---|
FSM tutorial provide code example (section 5.3) to illustrate this model serialization in Kermeta |
In order to link the instance file with its meta-model, a relative path (nsURI) should be provided. So, after the creation of the metamodel, we need to register this metamodel into the EMF Package Registry. In deployed mode (ie. in a runtime workbench), the ecore is automatically registered by the plugin. In development mode, you need to manually register it.
There is two ways to do that :
deploying an EMF plugin which add permanently the meta model to the Eclipse's EMF Package Registry;
registering dynamically the meta model on it.
| Note |
|---|---|
Take look at the example below if you want to know how to register a matamodel :
|
Once we've defined the structure of your language, this next step will show how to add constraints specified inside your language. Constraints on metamodels are static semantic. For instance you may add well formedness rules (contracts) to control errors made by users.
Thanks to aspect weaving, Kermeta allows you to reopen ecore class definition in order to add pre/post condition into it so as to satisfy the specified constraints. You only have to weave these pre/post-conditions (for instace adding some invariants) and call the method checkAllInvariant() on the root element of the model to check the contract.
| Tip |
|---|---|
These constraints can also be expressed in Object Constraint Language (OCL) which is the Object Management Group (OMG) official language. You can import them merely by calling these methods. Kermeta offer the same easy navigation inside existing model in OCL (<Collection>.each, <Collection>.forAll, ...). |
| Note |
|---|---|
Examples of how to add contract to your ecore model can be reached in the examples below :
|
Like adding the contracts seen on the previous chapter, some dynamic semantics can be added to our metamodel through Kermeta aspect weaving. According to the dynamic behave that we want to express, we weave aspect operation inside each element of the metamodel where there is an action to express (i.e.: add methods that represent the action that you want for that element).
To do so you have to define a virtual machine (VM) representing the application domain where you'are going to weave your methods.
If needed, you can implement a Kermeta wrapper to another language or library to add missing feature to your VM (For example, you can call Java.lang.Math to perform calculation or Java AWT for drawing).
| Note |
|---|---|
A complete example is given inside :
|
In this next part of the tutorial, we manage the transformation of the metamodel or its compilation to another environement.
Through the same mechanism of aspect weaving provided in Kermeta, you map your language with another environment through weaving "compilation".
| Note |
|---|---|
Code example on how to implement those weaving "compilation" are available at :
|
The final step is deploying the DSL environment inside an eclipse GUI. These improvements begin with an appropriate UI for the DSL (editor, popupmenu, icon, wizard, ...). Then through the Plug-in Development Environment (PDE) offered by eclipse, ui elements are added to interact with the interpreter of our DSL.
| Note |
|---|---|
An example on how to implement those ui tweaking is provided in the tutorial below :
|
This is the end of this tutorial, we've covered the needed processes to build a Model Development Kit for a DSL with Kermeta. Now, using Kermeta, you should be able to implement your own DSL language starting from "just" an .ecore file (remember our first illustration) .
You may either move on to the full examples through the FSM tutorial and the Logo Tutorial in order to see the implementation of these processes or either you may play it back to the begining.