Firstly, we present to you how to create a KerMeta file. Then loading a first Kermeta program can be achieved by just copying the code provided in the following sections, following carefully the suggested instructions. Readers who want to directly load their own models should directly go to the section A template for a complete Kermeta program and customize the given template.
You can start with opening the Kermeta perspective with Window->Open Perspective -> Other -> Kermeta and create a new Kermeta project (File -> New -> New Kermeta Project into the Kermeta perspective). Name it org.kermeta.fsm.serialisation, copy the file fsm.ecore (from fr.irisa.triskell.kermeta.samples.fsm.demoAspect/metamodels/fsm.ecore) into metamodel folder. The following section presents how to create a new Kermeta file.
We want to add a new kermeta file into the folder kermeta into org.kermeta.fsm.serialisation/src.
![[Tip]](gfx/admonitions/tip.gif) | Tip |
|---|---|
This sample is available in the FSM Solutions in the project fr.irisa.triskell.kermeta.samples.fsm.serialisation |
To do this, select in the main menu of Eclipse
"File" > "New" ->"New Kermeta File"
This action opens the following window.
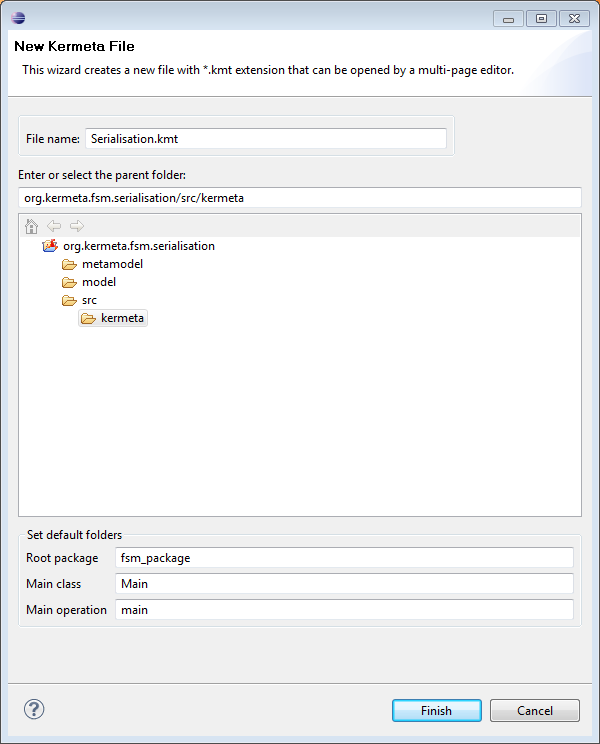
Give a name (Serialisation.kmt for instance) to the new file, select a location (The default one is good for us) and change the package to fsm_package. Click on "Finish".
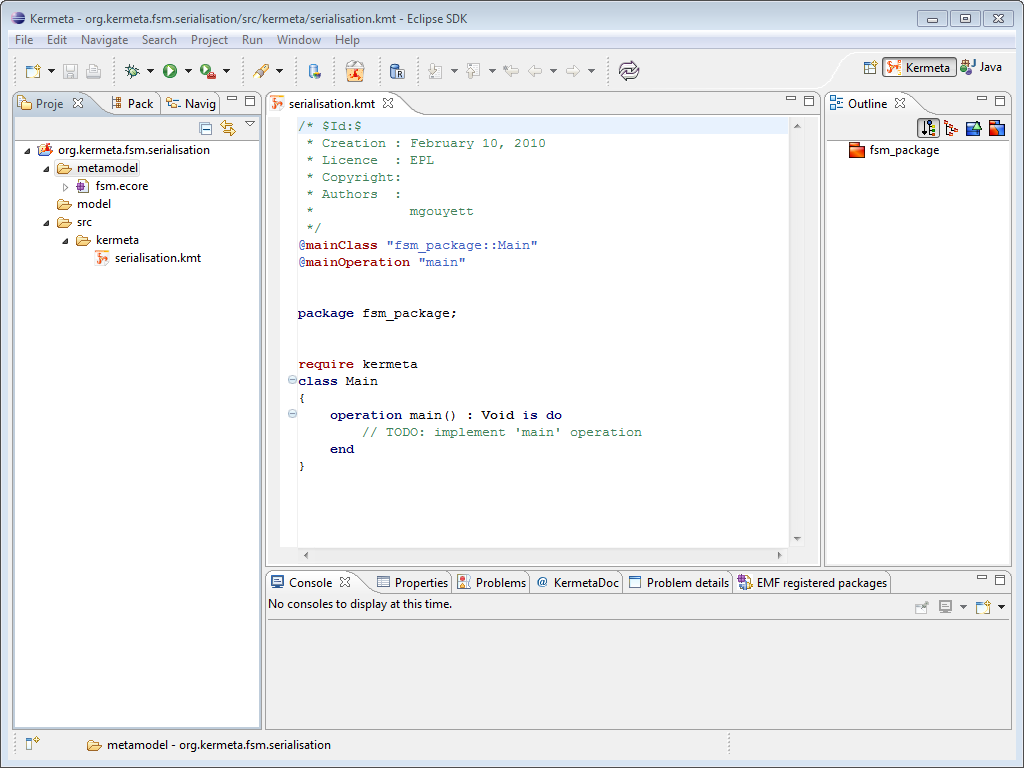
Now your main window should look like the one below. The file is written in KerMeta language. So you can edit this file to add some classes, attributes and so on using the KerMeta language (read Kermeta Manual for more details on KerMeta language).
| Create a Kermeta file into another perspective |
|---|---|
If you are not into the Kermeta perspective you can create a new Kermeta file with File -> New -> Other -> Kermeta -> New Kermeta File |
| Add the Kermeta nature to a project |
|---|---|
If your project is not a Kemeta project you can add the Kermeta nature on it. Right click on the project Kermeta-> Add Kermeta nature. It permit to check the .kmt files at the beginning of Eclipse. |
Now, we add Kermeta code to load and save models compliant with the fsm.ecore metamodel. For this you need to register the EMF metamodel into the Package Registry.
If you want to save a model conform to a particular metamodel whatever you want into the workspace it is useful to register its metamodel into the EMF Package Registry. Indeed, if the meta-model is not registered into the EMF Package Registry, a relative path is used to link the instance file with its meta-model. So we need to register this meta model into the EMF Package Registry. There is two ways to do that, deploying an EMF plugin like in the section Tree view editor which add permanently the meta model to the Eclipse's EMF Package Registry or register dynamically the meta model on it thanks clicking on the ecore metamodel file -> EPackages registration -> Register EPackages into repository.
![[Warning]](gfx/admonitions/warning.gif) | Dynamical EMF Registration is not permanent |
|---|---|
You need to register again the meta models for each new instance of Eclipse. |
The following menu EPackages registration have three entries :
Re-Register EPackages into registry : unregister and register again the EPackage in order to take into account the meta model's changes
Unregister EPackages into registry : remove EPackage from EMF EPackage registry
Register EPackages into registry : add EPackage from EMF EPackage registry
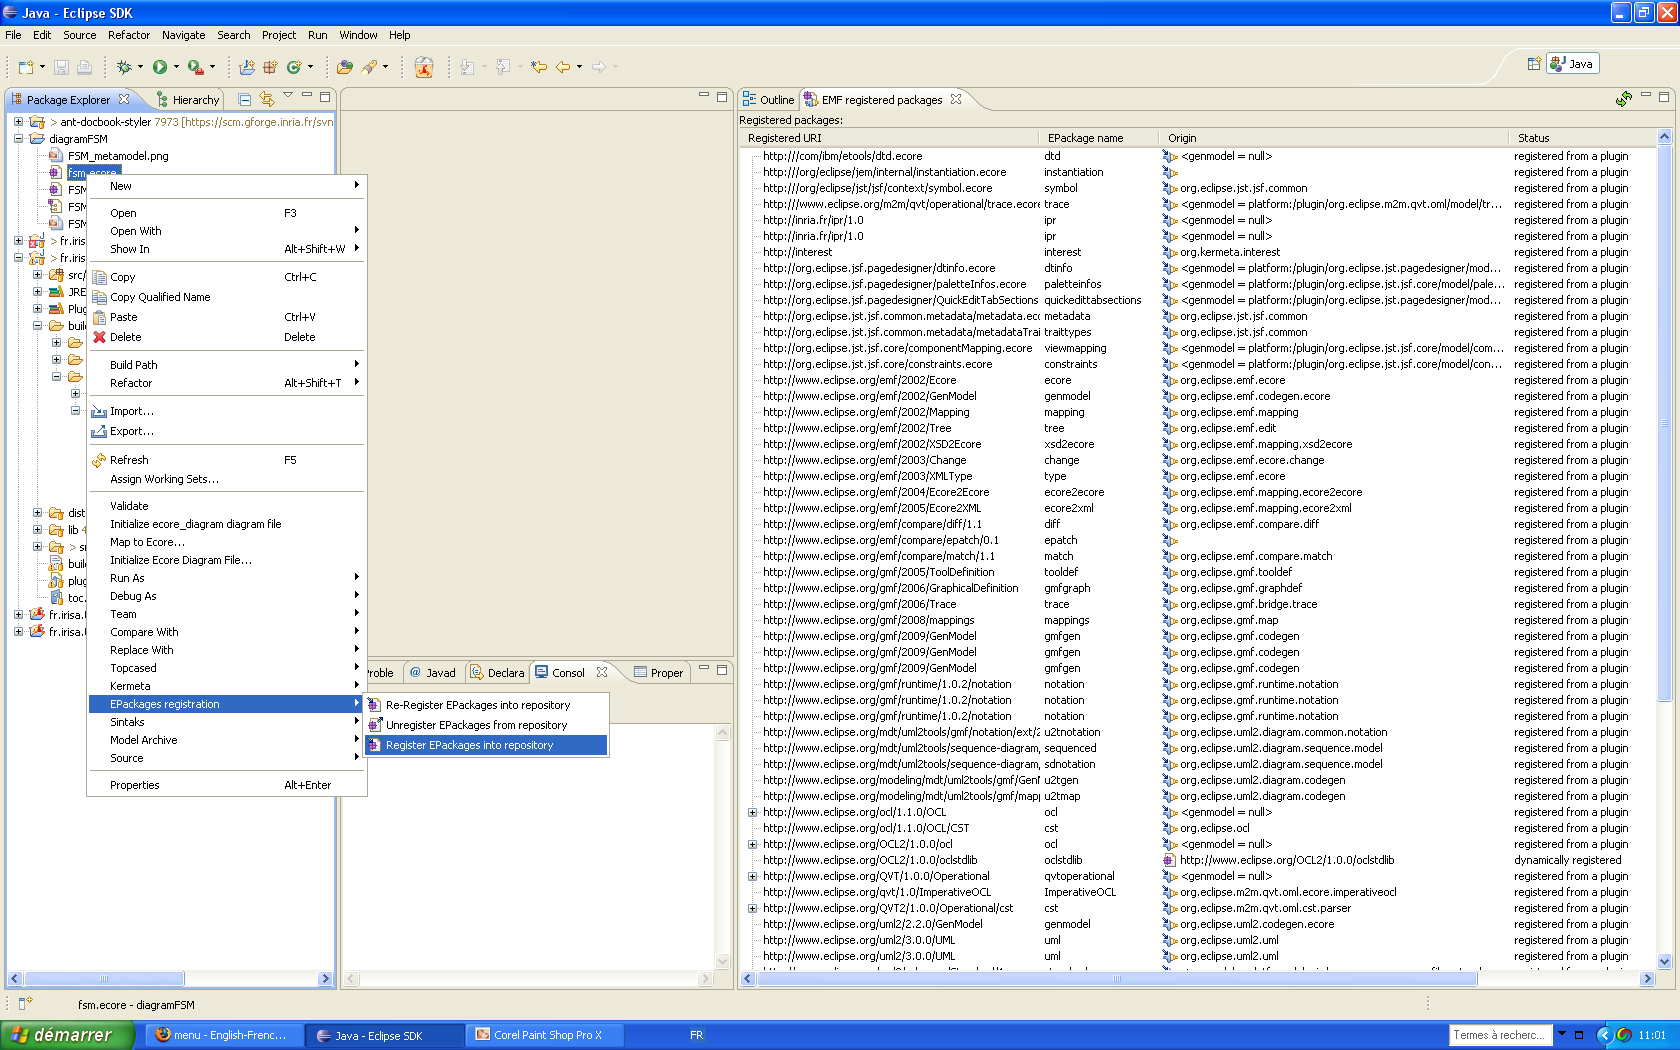
Then click on the followings icons :


Now, we use Kermeta to load an save models i.e to serialise the models. So, register the fsm.ecore model as we presented above to use it in the example.
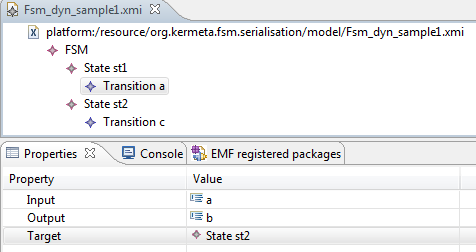
By serialisation, we mean here : to save and load models thanks to the presistence library. For these following sections copy and paste on your new file Serialisation.kmt or look at the file serialisation.kmt into fr.irisa.triskell.kermeta.sample.fsm.serialisation/kermeta. Create a new dynamic instance for FSM named Fsm_dyn_sample1.xmi in the folder model like in the section Dynamic instances . Add on it two states st1 et st2 and two transitions. The first transition from st1 to st2 consume an "a" and produce a "b" whereas the second transition from st2 to st2 consume a "c" and produce a "d". This xmi file should look like this :
The following code sample load a previously created FSM model. Copy and paste it on org.kermeta.fsm.serialisation/src/kermeta/serialisation.kmt or see the serialisation.kmt file on fr.irisa.triskell.kermeta.samples.fsm.serialisation/src/kermeta/serialisation.kmt.
@mainClass "fsm_package::Main"
@mainOperation "main"
package fsm_package;
require kermeta
require "http://www.kermeta.org/fsm"
 using kermeta::persistence
 using kermeta::standard
class Main
{
operation main() : Void is do
// Input fsm
var fsm1 : fsm::FSM
// Create the repository, then the resource
var repository : EMFRepository init EMFRepository.new
var resource : EMFResource
resource ?= repository.getResource("platform:/resource/org.kermeta.fsm.serialisation/model/Fsm_dyn_sample1.xmi")
using kermeta::standard
class Main
{
operation main() : Void is do
// Input fsm
var fsm1 : fsm::FSM
// Create the repository, then the resource
var repository : EMFRepository init EMFRepository.new
var resource : EMFResource
resource ?= repository.getResource("platform:/resource/org.kermeta.fsm.serialisation/model/Fsm_dyn_sample1.xmi")
 resource.load
// Load the fsm (we get the instance)
fsm1 ?= resource.one
resource.load
// Load the fsm (we get the instance)
fsm1 ?= resource.one
 // Check that the fsm was correctly loaded
fsm1.ownedState.each { s | stdio.writeln("-> "+s.name)
s.outgoingTransition.each { ti | stdio.writeln( "outgoing : " + " source " + ti.source.name + " target " + ti.target.name + " input : " + ti.input + " output : " + ti.output)}
s.incomingTransition.each { to | stdio.writeln( "incoming : " + " source " + to.source.name + " target " + to.target.name +" input : " + to.input + " output : " + to.output )}
}
end
}
// Check that the fsm was correctly loaded
fsm1.ownedState.each { s | stdio.writeln("-> "+s.name)
s.outgoingTransition.each { ti | stdio.writeln( "outgoing : " + " source " + ti.source.name + " target " + ti.target.name + " input : " + ti.input + " output : " + ti.output)}
s.incomingTransition.each { to | stdio.writeln( "incoming : " + " source " + to.source.name + " target " + to.target.name +" input : " + to.input + " output : " + to.output )}
}
end
}
To serialize the class definition, the nsURI of the meta model need to be known. | |||||||
This method permits to retrieve the resource where the model is stored or create a new resource if it does not exist. | |||||||
The persistence permits to load and save EMF models. The key word using is used to simplify writing code like import in Java. | |||||||
resource is collection of instances which are in the root file. The first instance of this resource is retrieve by the method one.
|
Example 5.1. Load an EMF model with Kermeta
To run this file simply right click on it (Run
As -> Run As Kermeta Application). You
should obtain the following trace in the Eclipse's console :
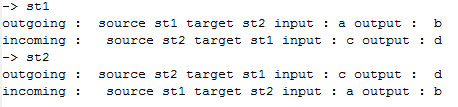
At this stage, it should be interesting to be able to modify a previously loaded model using Kermeta before saving it. The procedure is very simple: do your manipulation as if your loaded FSM model is a Kermeta model (which is, in effect, the case!), and then, simply call a save method on the handling resource. For this purpose, the following code can be added at the end of the main operation defined in the above section:
var newstate : fsm::State init fsm::State.new
	newstate.name := "s_new"
	fsm1.ownedState.add(newstate)
      // save fsm1
      resource.save()
A new state s_new appears on the file Fsm_dyn_sample1.xmi.
It is also possible to save the modified model in a new file instead of overwriting
the initial one by using the saveWithNewURI() method. To this end, just
replace the last line of above code (resource.save()) by the following
one:
resource.saveWithNewURI("platform:/resource/org.kermeta.fsm.serialisation/model/modified_dyn_sample1.xmi")Saving a programmatically generated model requires to use a new specific instruction
that add the created Fsm root class to the destination resource. The
following code chunk creates a simple EMF model with 2 states (named “foo”, and “bar”),
and 2 transitions. Saving it then consists in adding the root class (i.e. the model
object) stored in the variable fsm2 into the resource instances.
var another_resource : EMFResource
another_resource ?= repository.createResource(
"platform:/resource/org.kermeta.fsm.serialisation/model/Fsm_scratch_sample.xmi",
"platform:/resource/org.kermeta.fsm.serialisation/metamodel/fsm.ecore")
var fsm2 : fsm::FSM init fsm::FSM.new
var s0 : fsm::State init fsm::State.new
var s1 : fsm::State init fsm::State.new
var t01 : fsm::Transition init fsm::Transition.new
var t11 : fsm::Transition init fsm::Transition.new
s0.name := "foo"
s1.name := "bar"
t01.source := s0
t01.target := s1
t11.source := s1
t11.target := s1
fsm2.ownedState.add(s0)
fsm2.ownedState.add(s1)
s0.outgoingTransition.add(t01)
s1.outgoingTransition.add(t11)
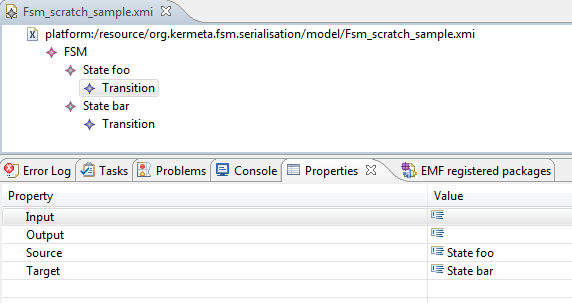
// save the from-scratch model!
another_resource.add(fsm2)
another_resource.save()This program should return the following FSM model (viewed with the reflexive editor):
The following short code sample provides a comprehensive code template (replace the <words>) for model loading. Note here that the term model object is appropriate (better than root class!): loading a model consists in getting the root class, from which, thanks to the containment property (see section, all the contained instances can be accessed.
@mainClass "fsm_package::Main"
@mainOperation "main"
package fsm_package;
require kermeta
require "< nsURI of the metamodel >"

using kermeta::persistence
using kermeta::standard
class Main
{
 operation main() : Void is do
      // Variable for your input EMF model
      var <my_model_object> : <type_of_my_model>
      // Create the repository, then the resource
      var <my_rep> : EMFRepository init EMFRepository.new
      var <my_resource> : EMFResource
      <my_resource> ?= repository.getResource(
      "<relative_path_of_my_model_to_load>"),
      <my_resource>.load
     // Load the emf model - get the root class
      <my_model_object> ?= resource.one
     // You can now browse your model through its attributes/references
      <my_model_object>.<an_attribute_of_it>.each { o |
         stdio.writeln("-> "+o.toString) } )
    // Save your model in another file
      <my_resource>.saveWithNewUri("<relative_path_of_a_file_where_to_save_model>")
 end
}
| Depending models on the same EMFRepository |
|---|---|
Several models which have links between them must be saved into the same EMFRepository. Be careful on saving the resources (unlike load which retrieve all the resources). |
If your models have no dependancy between them, you can save them into several EMFRepository.
In the following chapters, we will study the sample fr.irisa.triskell.kermeta.samples.fsm.demoAspect.