How to integrate Kermeta programs with Java programs
Build : 2.1.1-SNAPSHOT 20130925-1232
Abstract
These tutorials serie demonstrates how to use the kermeta workbench in various scenarii that integrate kermeta programs with java programs.
The first serie shows how to call kermeta code from java programs.
The second serie shows how to call java compatible code from kermeta action language.
Table of Contents
- Presentation
- I. Calling Kermeta code from a Java program
- II. Calling Java code from a Kermeta program
List of Figures
Kermeta action language is a DSL that allows to manipulate models. However it isn't a general purpose language and thus doesn't directly offer all the libraries to build an application for example with a sophisticated GUI.
This serie of tutorials is about integrating Kermeta 2 code with its environment
![[Important]](gfx/admonitions/important.gif) | Prerequisite |
|---|---|
|
Preconditions so that the tutorials could run correctly
Alternatively to the first 3 points, you can use the predefined eclipse package with all kermeta tools preinstalled. |
| Important |
|---|---|
|
This tutorial serie explain various procedure to acheive some goal, however, the attentive reader must know that even if the presented procedure work, you may acheive similar results using alternative or slightly modifying the proposed procedure because you ma decide to use another tool or use it differently. Roughly, all this tutorial serie is actually about :
In all cases, there are various ways to compile, package and deploy, either using Eclipse builders or using maven. This tutorial will try to give suggestions and explain the underlying process but explaining maven, Eclipse, java, OSGI isn't in the scope of this document. The user must be ready to find and read the appropriate documentations. |
There are various ways to call Kermeta code from java programs. The details changes due to the actual deployment of the final code, this part present various scenarii that acheive that. Just pick the one which is most adpated to your architecture and deployment strategy.
This tutorial aims to show how to call kermeta code from a standalone Java program.
We are presenting this tutorial in 6 steps :
-
Generate a new Kermeta project "HelloWorldKmt"
-
Add a new operation which returns a string "hello world from a Kermeta project!!!"
-
Generate a Jar file of the Kermeta project (using a simplified pom.xml)
-
Create a new Java project
-
Call the Kermeta API from to the java project
-
Execute as a java application
We are using the new project Wizard which creates a new kermeta project "HelloWorldKmt" automatically.
-
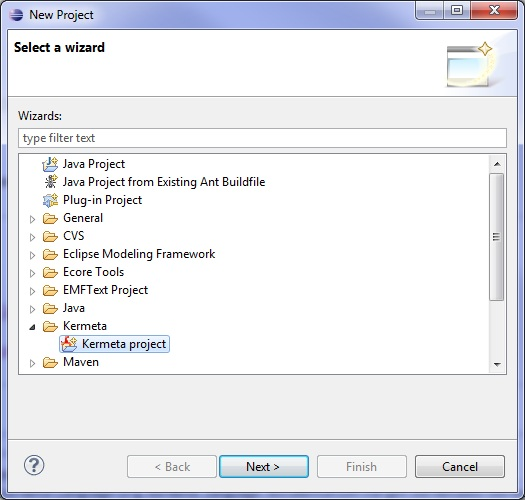
Inside eclipse context menu, select : File -> New -> Project...
-
Select "Kermeta project" and Click on "Next" Button
-
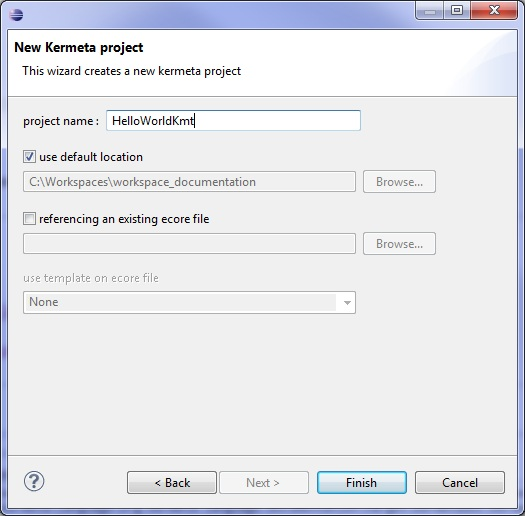
Wizard "New Project Kermeta" has just opened
-
Replace project name by "HelloWorldKmt" and Click on "Finish" Button
We are adding a new operation of the HelloWorld project, this operation should return a string : "Hello world from a Kermeta project!!!"
-
In the new kermeta project, open file : "MainClass.kmt"
-
Add in class MainClass the following program listing :
operation helloWorld() : String is do
	result := "Hello world from a Kermeta project!!!"
end
-
Compile the project and check there is no error
To Compile : right click on file "project.kp", select Kermeta2 -> Clean and Build Kermeta Project
We are creating the Jar file which should allow the interfacing of the Java project with a Kermeta API
-
Right click on file "project.kp", and select : Kermeta2 -> generate standalone jar exporter (via simple pom.xml)
A new file called "pom.xml" has been generated at the root of the project
-
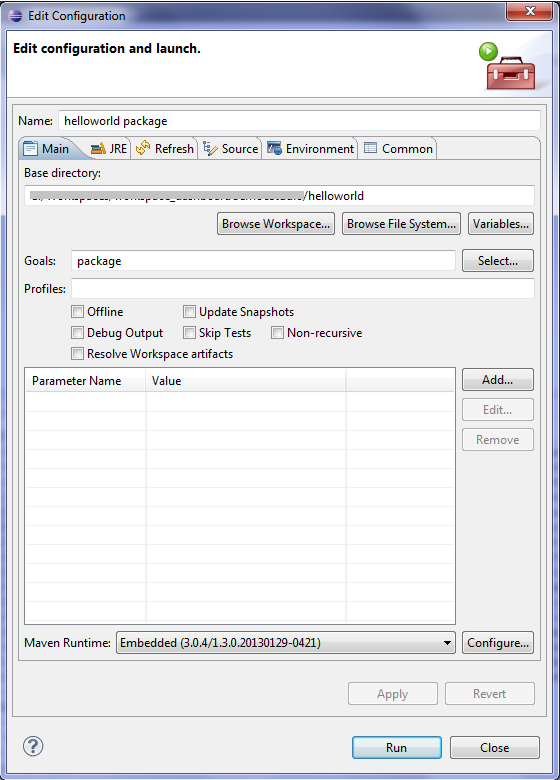
Right click on file "pom.xml", select Run as -> Maven build...
-
A window is openned, in field "Goals:", put : "package" and then press button "run"
-
After have refreshed the project, In "target" folder check that a "helloworldkmt-0.0.1-SNAPSHOT.jar" has been created
This part consists to generate a new project java containing the jar file generated by the kermeta project before and its dependencies
-
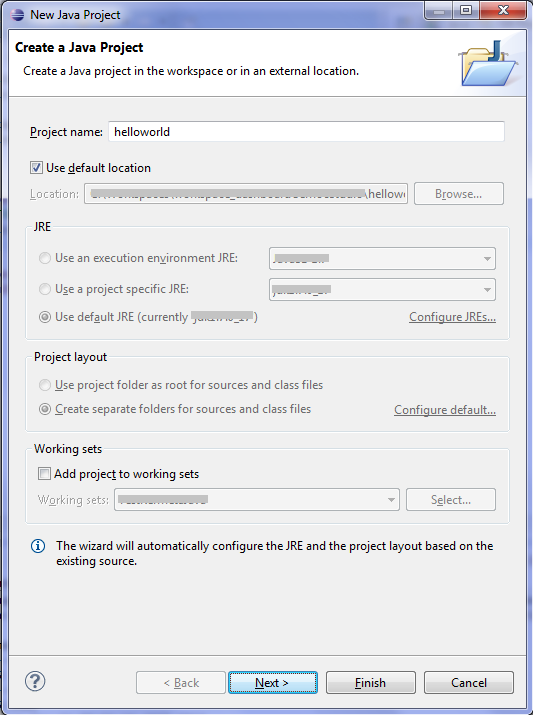
Inside eclipse context menu, select : File -> New -> Java Project
-
Wizard "New Java Project" has just opened
-
in field "Project name:", enter "helloworld" and click on button "next"
-
At the following window "Java Settings", select the tab "Libraries"
-
Click on button "Add JARs..."
Go to folder "helloworldKmt/target", select the jar file and then all jar file existing in the folder ""dependencies"
-
you should obtain that below :
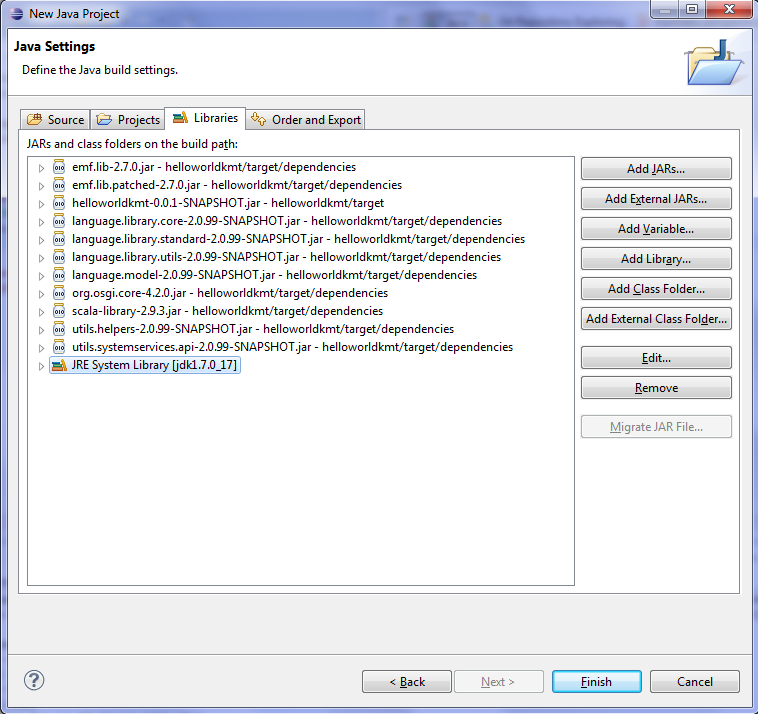
-
Click on button "Finish" and a new java project "helloworld" has been created in the workspace
This part consists to use the operation "helloWorld" defined in the project kermeta "helloworldkmt"
to display the message transmitting by the API kermeta on the console
-
Create a new java class containing the following listing programm
public static void main(String[] args) {
	// TODO Auto-generated method stub
	helloworldkmt.mainPackage.MainClass mc = helloworldkmt.mainPackage.KerRichFactory.createMainClass();
	System.out.println("Essai avec un code kermeta distant");
	System.out.println(mc.helloWorld());
}
-
Launch the java program
Right click on the class containing main operation -> Run As -> Java Application
-
Check the message "Hello world from a Kermeta project!!!" has been displayed on the console
This tutorial shows how a standalone java program can call kermeta operations that have been declared as main entry point of the kermeta program thanks to the @main tag on operations.
TODO explain and illustrate
This tutorial will detail the following points:
-
Create a new Kermeta project
-
Declare one or many operations as main operations using the @main tag
-
Generate a basic jar file from the Kermeta project (using a simplified pom.xml)
-
Create a new Java project that depends or embedds the jar of the kermeta project
-
Call a Kermeta main operation using the corresponding Runner class from to the java project. These Runner classes will take care of the required initialization
-
Execute the java program as a standalone application
TODO
The generated
pom.xml
will look like the following :
<!-- Generated pom.xml, feel free to adapt it to your needs -->
<!-- The original goal of this generated pom.xml is to provide a mean to
	have a simple jar exporter. It supposes that your kermeta project correctly
	build using the eclipse interface.The eclipse interface is in charge of building
	all the classes. This pom is used only to create a jar from these classes
	or to run the kermeta application as a standalone java application. For more
	complex scenario, please consider the other pom.xml generators or assemble
	your own. -->
<!-- Usage : from a working eclipse kermeta project -->
<!-- "mvn package" will build a standalone jar -->
<!-- "mvn run" run the standalone jar -->
<!-- Please note that you may have to manually add some dependencies. (for
	example if your project is built by assembling several other project/jar) -->
<project xmlns="http://maven.apache.org/POM/4.0.0" xmlns:xsi="http://www.w3.org/2001/XMLSchema-instance"
	xsi:schemaLocation="http://maven.apache.org/POM/4.0.0 http://maven.apache.org/xsd/maven-4.0.0.xsd">
	<modelVersion>4.0.0</modelVersion>

	<groupId>hello</groupId>
	<artifactId>hello</artifactId>
	<version>0.0.1-SNAPSHOT</version>
	<packaging>jar</packaging>

	<name>hello</name>

	<properties>
		<project.build.sourceEncoding>UTF-8</project.build.sourceEncoding>
	</properties>

	<build>
		<resources>
			<resource>
				<directory>${project.build.directory}/scalaclasses</directory>
			</resource>
			<resource>
				<directory>${project.build.directory}/emfclasses</directory>
			</resource>
		</resources>
		<plugins>
			<plugin>
				<groupId>org.scala-tools</groupId>
				<artifactId>maven-scala-plugin</artifactId>
				<executions>
					<execution>
						<goals>
							<goal>compile</goal>
						</goals>
					</execution>
				</executions>
				<configuration>
					<launchers>
						<launcher>
							<id>runner.MainRunner</id>
							<mainClass>runner.MainRunner</mainClass>
						</launcher>
					</launchers>
					<jvmArgs>
						<jvmArg>-Xmx1024m</jvmArg>
					</jvmArgs>
				</configuration>
			</plugin>


			<plugin>
				<groupId>org.apache.maven.plugins</groupId>
				<artifactId>maven-dependency-plugin</artifactId>
				<version>2.7</version>
				<executions>
					<execution>
						<id>copy-dependencies</id>
						<phase>package</phase>
						<goals>
							<goal>copy-dependencies</goal>
						</goals>
						<configuration>
							<outputDirectory>${project.build.directory}/dependencies</outputDirectory>
							<overWriteReleases>false</overWriteReleases>
							<overWriteSnapshots>false</overWriteSnapshots>
							<overWriteIfNewer>true</overWriteIfNewer>
						</configuration>
					</execution>
				</executions>
			</plugin>

			<plugin>
				<groupId>org.apache.felix</groupId>
				<artifactId>maven-bundle-plugin</artifactId>
				<version>2.3.7</version>
				<extensions>true</extensions>
				<configuration>
					<instructions>
						<Private-Package>*</Private-Package>
						<BundleClassPath>.</BundleClassPath>
					</instructions>
				</configuration>
			</plugin>
			<plugin>
				<groupId>org.codehaus.mojo</groupId>
				<artifactId>truezip-maven-plugin</artifactId>
				<version>1.0-beta-4</version>
				<executions>
					<execution>
						<id>remove-a-file</id>
						<phase>package</phase>
						<goals>
							<goal>remove</goal>
						</goals>
						<configuration>
							<fileset>
								<directory>target/${project.artifactId}-${project.version}.jar/META-INF</directory>
								<includes>
									<include>**/*.RSA</include>
									<include>**/*.SF</include>
								</includes>
							</fileset>
						</configuration>
					</execution>
				</executions>
			</plugin>
		</plugins>
	</build>
	<repositories>
		<repository>
			<id>Inria Public</id>
			<url>http://maven.irisa.fr/artifactory/public/</url>
		</repository>
		<repository>
			<id>Scala-tools Maven2 Repository</id>
			<url>http://scala-tools.org/repo-releases</url>
		</repository>
	</repositories>
	<pluginRepositories>
		<pluginRepository>
			<id>scala-tools.org</id>
			<url>http://maven.irisa.fr/artifactory/public-release/</url>
		</pluginRepository>
	</pluginRepositories>
	<dependencies>
		<dependency>
			<groupId>org.scala-lang</groupId>
			<artifactId>scala-library</artifactId>
			<version>2.9.3</version>
			<scope>compile</scope>
		</dependency>
		<dependency>
			<groupId>org.kermeta.language</groupId>
			<artifactId>org.kermeta.language.model</artifactId>
			<version>2.0.99-SNAPSHOT</version>
			<scope>compile</scope>
		</dependency>
		<dependency>
			<groupId>org.kermeta.emf</groupId>
			<artifactId>emf.lib</artifactId>
			<version>2.7.0</version>
			<scope>compile</scope>
		</dependency>
		<dependency>
			<groupId>org.kermeta.emf</groupId>
			<artifactId>emf.lib.patched</artifactId>
			<version>2.7.0</version>
			<scope>compile</scope>
		</dependency>
		<dependency>
			<groupId>org.kermeta.language</groupId>
			<artifactId>org.kermeta.language.library.core</artifactId>
			<version>2.0.99-SNAPSHOT</version>
			<scope>compile</scope>
		</dependency>
		<!-- can be replaced by  org.kermeta.language.library.standard if you do only an importProject "library.standard" -->
		<dependency>
			<groupId>org.kermeta.language</groupId>
			<artifactId>org.kermeta.language.library.standard</artifactId>
			<version>2.0.99-SNAPSHOT</version>
			<scope>compile</scope>
		</dependency>
		<dependency>
			<groupId>org.kermeta.utils</groupId>
			<artifactId>utils.helpers</artifactId>
			<version>2.0.99-SNAPSHOT</version>
			<scope>compile</scope>
		</dependency>
		<dependency>
			<groupId>org.kermeta.utils</groupId>
			<artifactId>utils.systemservices.api</artifactId>
			<version>2.0.99-SNAPSHOT</version>
			<scope>compile</scope>
		</dependency>

		<!-- Add more dependencies here -->
	</dependencies>
</project>
This tutorial aims to show how to directly call the richFoo and they operations without going through the @main operations. (usefull for example for fine grain UI integration with aspectized code). This is a variant of the tutorial Chapter 2, Calling Kermeta main operations from a standalone Java program but instead of relying on the generated runner classes, the user directly call the kermeta classes and operations. Then, depending on the origin of the classes, these classes can then be used either with a pure EMF point of view (ie. only using the EMF generated code) or might be manipulated as Kermeta (ie. using the aspect). This requires some understanding of the architecture of the generated code.
TODO explain and illustrate
This tutorial will detail the following points:
-
Create a new Kermeta project
-
Declare some classes and some operations
-
Generate a basic jar file from the Kermeta project (using a simplified pom.xml)
-
Create a new Java project that depends or embedds the jar of the kermeta project
-
In the java code, call the initialization of the kermeta code
create some object from Kermeta classes and call operation on it it.
-
In the Kermeta project, add an ecore model with some operation
By aspect, add some behavior to the operation.
-
In the java code, in pure EMF style, load a model conforming to this ecore.
Call kermeta aspect operation by using exclusively the EMF api.
-
Execute the java program as a standalone application
This tutorial aims to show how to embedd kermeta code in an Eclipse plugin. It also shows how to add some java code that is able to initialize and call the kermeta code in Eclipse context.
Due to the requirement of OSGI deployment used by eclipse. The simple packaging strategy used in the previous chapter isn't enough. Some special care is required while packaging the code.
TODO
This tutorial will detail two scenarii:
-
the Kermeta code must be exposed to and used by several plugins
-
the Kermeta code is used by a single plugin and can be privatly used by it
Kermeta plugin needing to be exposed to several plugins
-
Create a new Kermeta project
-
Configure the project and a pom.xml that is able to take into account both Kermeta code and some java code that is able to generate an OSGI compatible jar file
The current recommanded way is to use maven-bundle-plugin.
-
Add some java code that initialize the kermeta code and expose some operations of the kermeta code as a simplified API
Add some java code that redirect kermeta StdIO messages to a dedicated eclipse console
- Create a plugin project that will use it. (for example an user interface)
-
Deploy and execute the plugins in an eclipse runtime workbench
Currently, the recommanded way to deploy the plugins is to use the OSGI provisionner
tips about how debugging
The tutorial also presents an alternative packaging that ease eclipse UI debugging: the UI plugin directly embedds the kermeta jar
Kermeta code is used by a single plugin and is privatly used by it. The kermeta code is compiled using eclipse and the simple pom.xml
-
Create an eclipse plugin
-
Automate the copy of the jar produced from the kermeta project to an internal lib folder: with eclipse ant builder
-
configure the plugin to use the jar
update the dependencies according to the one computed from the kermeta jar
- Create a plugin project that will use it. (for example an user interface)
-
Deploy and execute the plugins in an eclipse runtime workbench with the classic eclipse approeches
-
Use of a tycho driven pom.xml to automate the build of such plugin (use copy-dependency to grab the kermeta jar as a precompile step)
Alternative, The tutorial also presents an alternative packaging that ease eclipse UI debugging: the UI plugin directly embedds the kermeta jar, the Kermeta code is fully compiled using maven
Kermeta code is used by a single plugin and is privatly used by it
-
Create an eclipse plugin
-
Automate the copy of the jar produced from the kermeta project to an internal lib folder: with eclipse ant builder
-
configure the plugin to use the jar
update the dependencies according to the one computed from the kermeta jar
- Create a plugin project that will use it. (for example an user interface)
-
Deploy and execute the plugins in an eclipse runtime workbench with the classic eclipse approeches
-
Use of a tycho driven pom.xml to automate the build of such plugin (use copy-dependency to grab the kermeta jar as a precompile step)
Kermeta offers several ways to call Java code from a kermeta program. This also works with any Java compatible code like Scala and groovy. This part presents various scenarii explaining how to achieve that.
This tutorial show how to call some java static operations directly with the extern operator. It also shows how to package and declare the java code for being used by the extern operator.
TODO
This tutorial will detail the following points:
-
create a java project that proposes some static operations
-
create a jar from this java project
the current recommanded packaging method is to use maven
-
create a kermeta project
configure the project to use this java project and its eventual depdendencies
call the static operation
-
compile and run the kermeta application
Kermeta 2 is able to reuse the java code generated from an ecore model. Thus, if the generated code is customized through the GENERATED NOT annotations, this code will natively be used by kermeta. This provides a nice and elegant way to encapsualte java code in a model.
TODO illustrate that on a small sample.
This tutorial will detail the following points:
-
create an EMF project with an ecore model that proposes some operations
generate the java code from the ecore model
-
add some custom code in the model operations
use "generated NOT" annotation to make sure the code cannot be overidden when regenerating the model
-
create a jar from this java project
the current recommanded packaging method is to use maven and tycho
-
create a kermeta project
configure the project to use this java project and its eventual depdendencies
call the operations in the model
-
compile and run the kermeta application
Kermeta 2 provides a wrapper for Groovy. This allows to call this dynamic language directly from Kermeta.
TODO illustrate that on a small sample.
This tutorial will detail the following points:
-
create a kermeta project
configure the project to use the groovy wrapper
-
add kermeta code that will call a groovy expression that uses some kermeta elements.
-
add a sample ecore model in the project
add some kermeta code that will use groovy to navigate and call operations in the model.
Add kermeta code that extract the groovy expression from the model itself before applying it.
-
compile and run the kermeta application
Create a new Kermeta project with the wizard.(see previous tutorials)
In the project.kp, add the following resources
resource groovy = "platform:/plugin/org.kermeta.extra.groovyembedded" alternative "mvn:org.kermeta.extra/groovyembedded/2.0.99-SNAPSHOT"
resource groovy_all = "mvn:org.codehaus.groovy/groovy-all/2.1.2"
and the following importProject
importProject groovy
importProject groovy_all
This indicates that the wrapper and its bytecode dependencies will be available when compiling and when launching as a standalone kermeta application.
Somewhere in your kermeta code you can call a groovy expression stored in a string. For example:
var args :kermeta::utils::Hashtable<kermeta::standard::String, kermeta::standard::Object> init
	kermeta::utils::Hashtable<kermeta::standard::String, kermeta::standard::Object>.new
args.put("self", self)
args.put("anotherParam", "someString")
var res1 :kermeta::standard::Object init
	extern org::kermeta::extra::groovyembedded::GroovyEmbedder.run("println 'Hello GroovyWorld! ' +self' '+anotherParam; return 'foo';", args)
stdio.writeln(res1.toString)
Where
args
can store object coming from Kermeta and be accessed by the groovy
script. In the above sample,
self
is mapped to a Groovy argument named self, and some string is
mapped to a Groovy argument named anotherParam. Both are printed on
the standard output. The return can be used to send back data to
the Kermeta side in
res1
. Another way to send back data would be to simply
send an object in
an argument and change its content from Groovy.